NIS (Network Information Service) — Installation & Configuration Guide
Rocky Linux 8.10
Table of Contents
- Introduction to NIS
- NIS Server Installation & Configuration
- NIS Client Installation & Configuration
- Final Verification & Testing
- Key Commands Reference
1. Introduction to NIS
NIS (Network Information Service), originally called Yellow Pages (YP), is a client-server directory service protocol developed by Sun Microsystems. It allows a group of machines on a network to share configuration files such as users, passwords, groups, and hostnames from a central server.
Why Use NIS?
- ✅ Centralized user account management across multiple Linux machines
- ✅ Users can log in to any NIS client using the same credentials
- ✅ Eliminates the need to manually create accounts on every machine
- ✅ Easy to manage in lab, development, and small enterprise environments
Lab Environment
| Role | Hostname | IP Address |
|---|---|---|
| NIS Server | labtesting.local |
192.168.245.132 |
| NIS Client | labtesing-client.local |
Same subnet |
| NIS Domain | labtesting.local |
Rocky Linux 8.10 |
2. NIS Server Installation & Configuration
Step 1 — Verify Repositories
Before installing NIS packages, verify that the required repositories are enabled. The ypserv package comes from the AppStream repository.
dnf repolist
What this does: Lists all enabled DNF repositories. You should see
appstream,baseos,epel,extras, andpowertools.
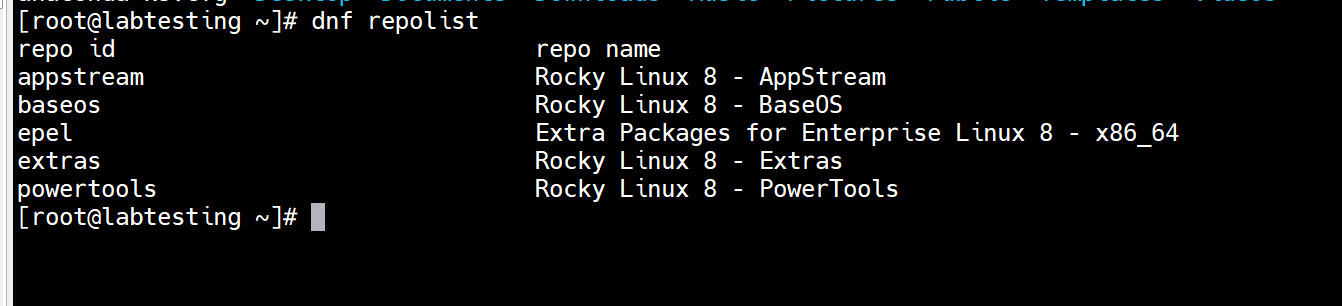 Figure 1: Enabled repositories on Rocky Linux 8.10
Step 2 — Install NIS Server Packages
Install the core NIS server packages: ypserv (the NIS server daemon) and rpcbind (the RPC port mapper that NIS depends on).
dnf install -y ypserv rpcbind
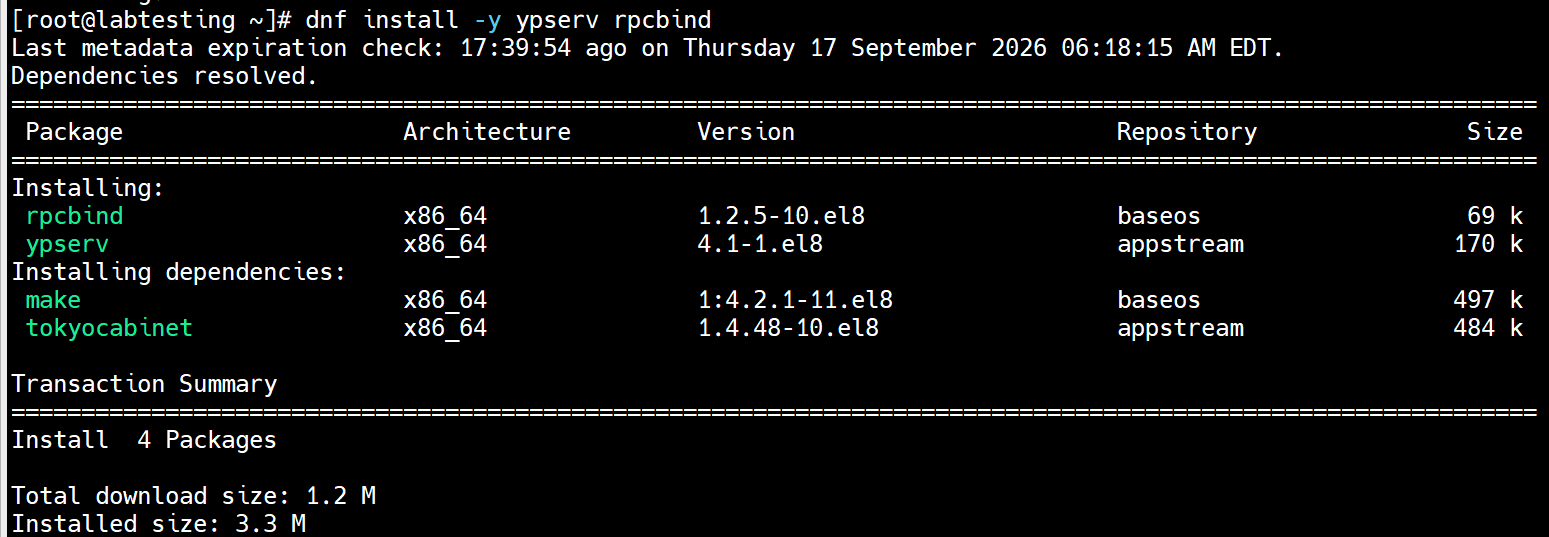 Figure 2: Installing ypserv and rpcbind — 4 packages installed (1.2 MB)
Step 3 — Set the NIS Domain Name
The NIS domain name groups the server and all its clients together. Every machine in the NIS environment must use the exact same domain name.
nisdomainname labtesting.local
What this does: Sets the NIS domain name to
labtesting.localfor the current session. Takes effect immediately but is not persistent across reboots.
 Figure 3: Setting NIS domain name to labtesting.local
To make the domain name persistent across reboots:
echo "NISDOMAIN=labtesting.local" >> /etc/sysconfig/network
cat /etc/sysconfig/network
What this does: The
>>operator appends to the file without overwriting it. Thecatcommand verifies the change was written correctly.
 Figure 4: Making NIS domain name persistent in /etc/sysconfig/network
Verify the domain name is correctly set:
nisdomainname
 Figure 5: Verifying NIS domain name — labtesting.local confirmed
Step 4 — Configure /etc/ypserv.conf
The ypserv.conf file controls NIS server behavior including access control and security settings.
vi /etc/ypserv.conf
Add this line at the bottom to restrict NIS access to your local subnet only:
192.168.1.0/24 : * : * : none
What this does: Format is
[Host/Network] : [Domain] : [Map] : [Security]. This means hosts in192.168.1.0/24can access all (*) NIS domains and all (*) maps.nonemeans no additional port security. Shadow passwords remain protected (those lines stay commented out).💡 Security Note: Keeping shadow password lines commented out protects encrypted passwords from being exposed to NIS clients — a critical security practice.
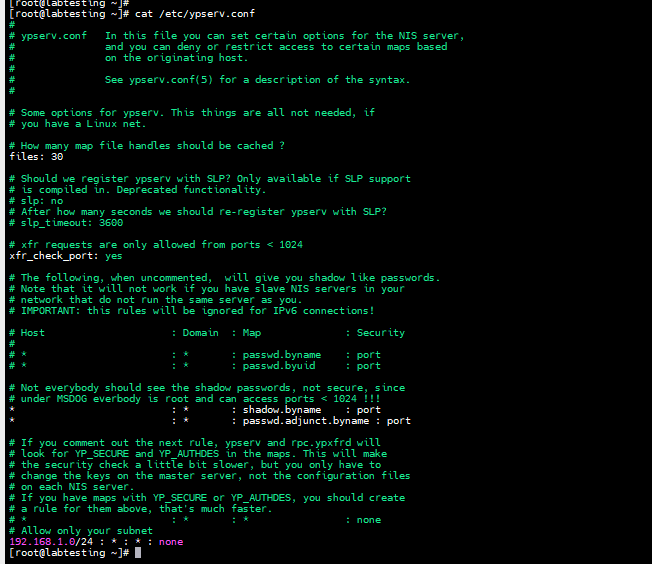 Figure 6: /etc/ypserv.conf — subnet restriction configured
Step 5 — Enable & Start NIS Services
NIS requires four services running on the server. Start rpcbind first as it is a dependency for all others.
# 1. RPC port mapper — prerequisite for all NIS services
systemctl enable --now rpcbind

# 2. Main NIS server daemon
systemctl enable --now ypserv

# 3. Password change service — allows clients to change passwords
systemctl enable --now yppasswdd.service

# 4. Map transfer accelerator — speeds up map transfers
systemctl enable --now ypxfrd.service
What
--nowdoes: The--nowflag withsystemctl enableboth enables the service (starts on boot) AND starts it immediately — no need for a separatesystemctl startcommand.
 Figure 7: rpcbind enabled and started
 Figure 8: ypserv enabled — symlink created in systemd
 Figure 9: yppasswdd enabled — password change service active
 Figure 10: ypxfrd enabled — map transfer accelerator active
Step 6 — Verify All Services Are Running
systemctl status rpcbind.service
systemctl status ypserv.service
systemctl status yppasswdd.service
systemctl status ypxfrd.service
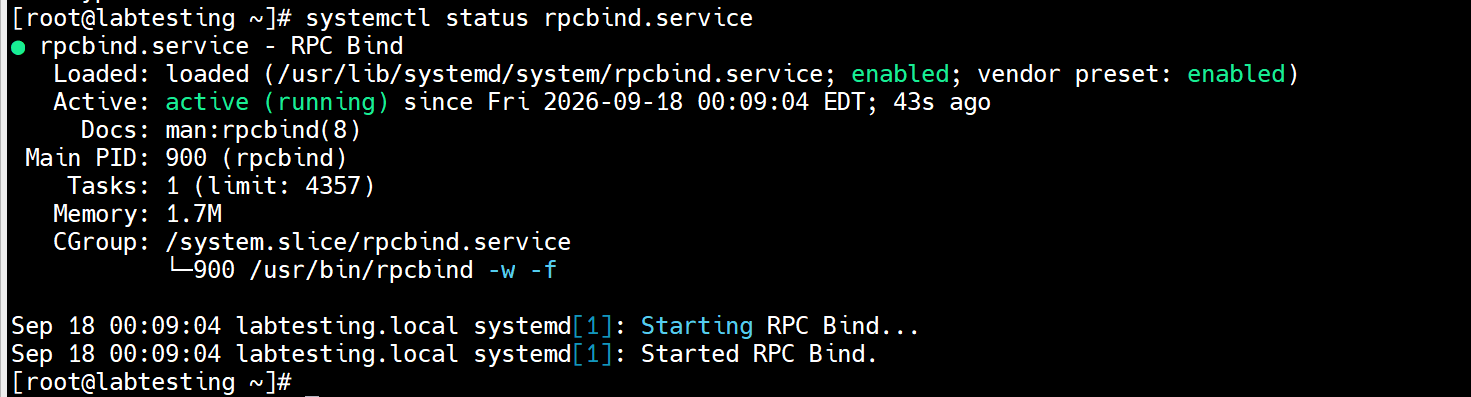 Figure 11: rpcbind.service — Active (running) since Sep 18 2026
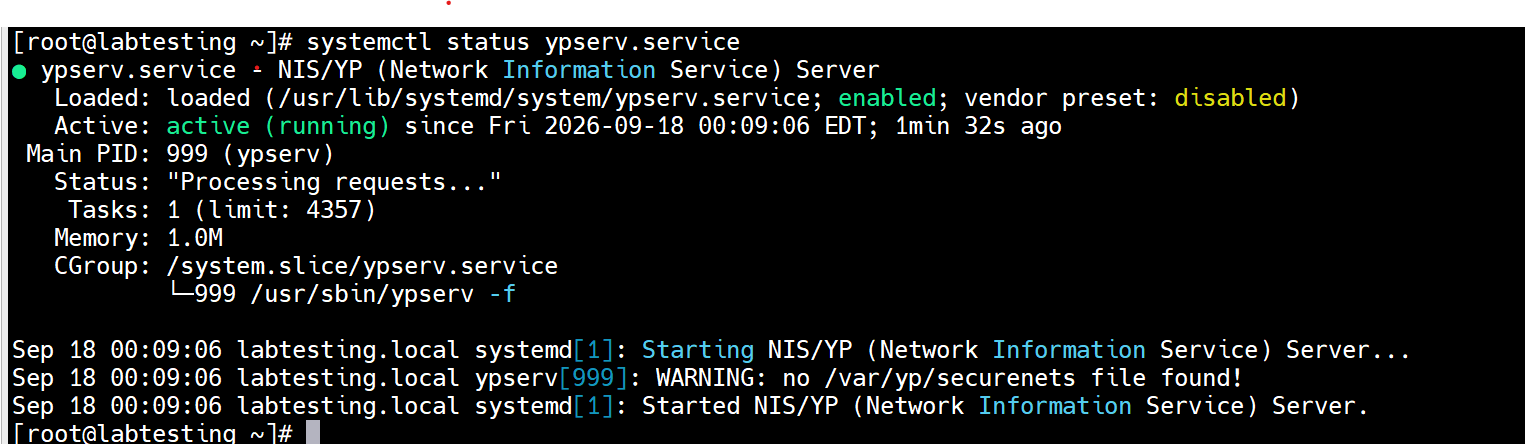 Figure 12: ypserv.service — Active (running), Processing requests...
💡 Note: The WARNING
no /var/yp/securenets file foundis harmless — it means access control is managed viaypserv.confinstead of thesecurenetsfile, which is our chosen approach.
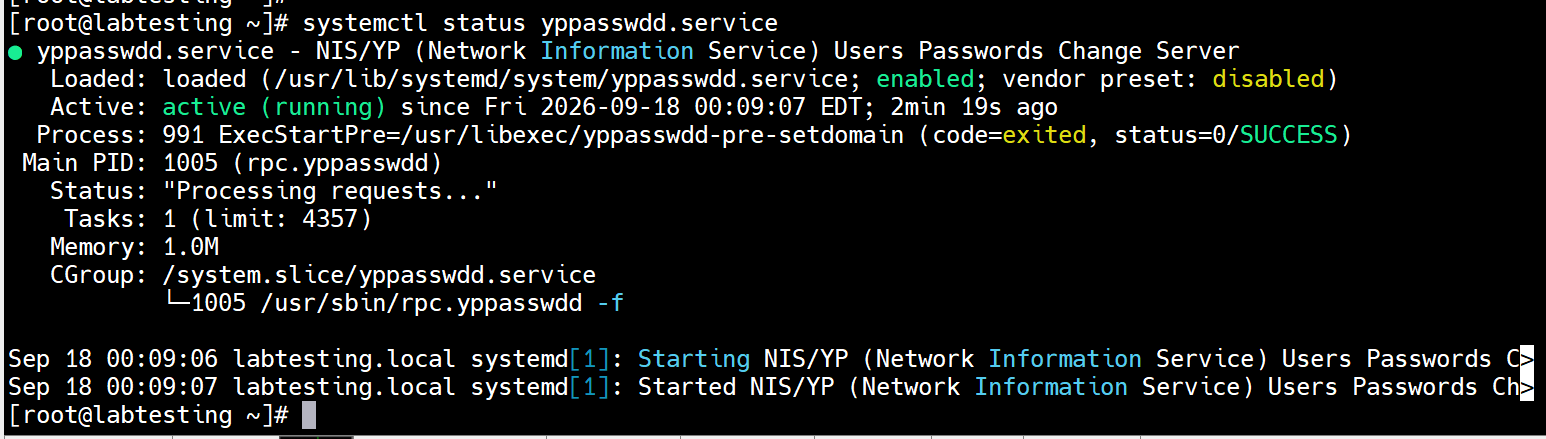 Figure 13: yppasswdd.service — Active (running)
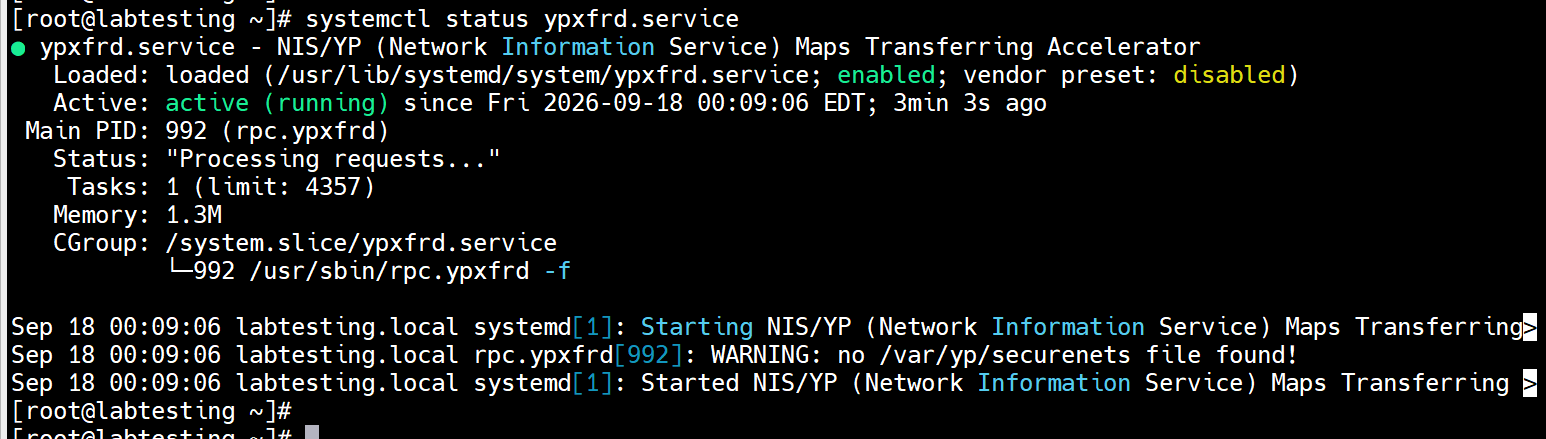 Figure 14: ypxfrd.service — Active (running)
Step 7 — Initialize the NIS Database (ypinit)
The ypinit command builds the initial NIS database (maps) from the system files. The -m flag designates this machine as the NIS master server.
/usr/lib64/yp/ypinit -m
What this does: Prompts you to enter the list of NIS servers. Type your server hostname, press Enter, then press
Ctrl+Dwhen done. Typeyto confirm. Then builds all NIS maps under/var/yp/labtesting.local/.
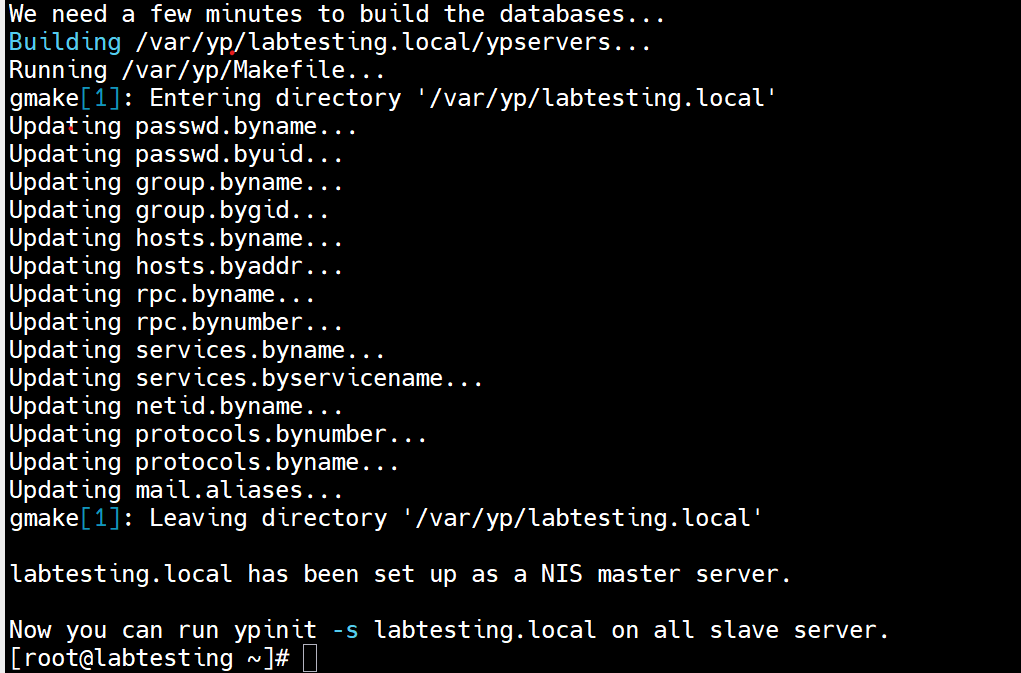 Figure 15: ypinit -m — Designating labtesting.local as NIS master server
Step 8 — Verify RPC Services
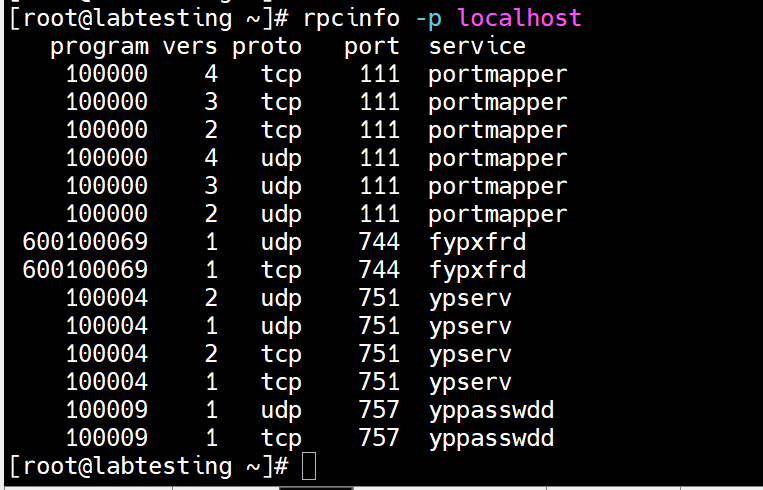
rpcinfo -p localhost
What this does: Lists all RPC programs registered with the port mapper. You should see
portmapper(111),ypserv(751),yppasswdd(757), andfypxfrd(744).
3. NIS Client Installation & Configuration
Step 1 — Install NIS Client Packages
On the client machine, install the required packages:
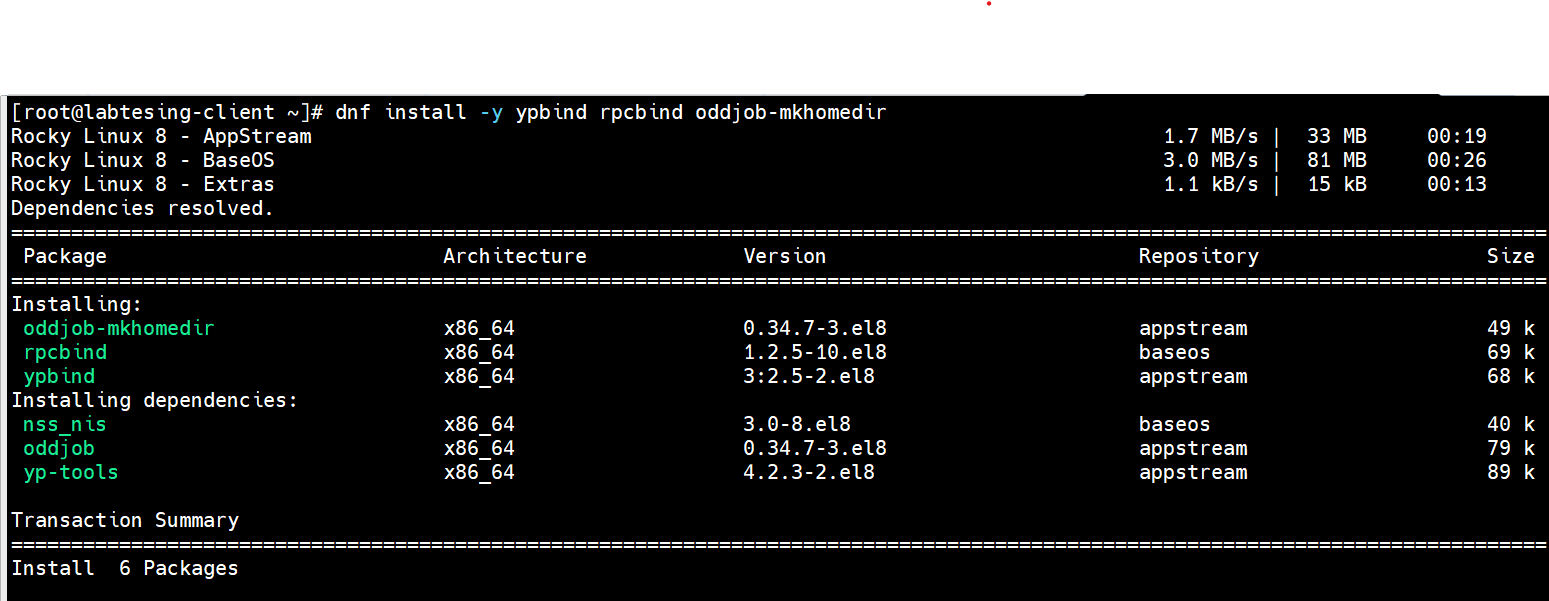
dnf install -y ypbind rpcbind oddjob-mkhomedir
What this does: Installs
ypbind(NIS client daemon),rpcbind, andoddjob-mkhomedir(auto-creates home directories on first login). Also installs dependencies:nss_nis(NSS plugin),oddjob, andyp-tools(ypcat, ypwhich, ypmatch).
Step 2 — Set NIS Domain Name on Client
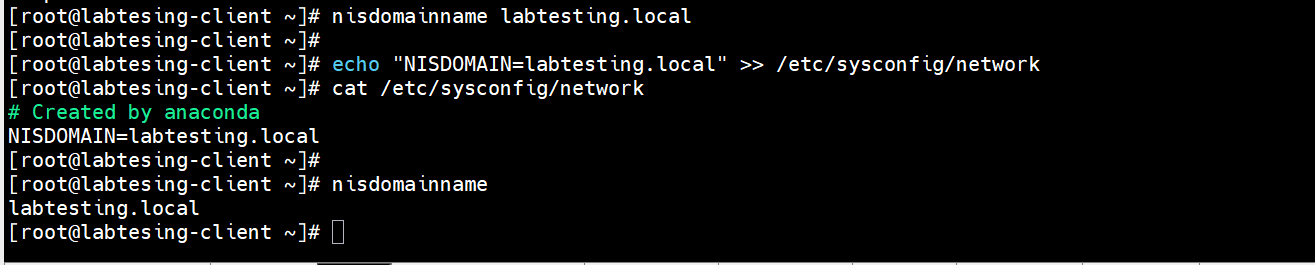
The domain name on the client MUST exactly match the server.
nisdomainname labtesting.local
echo "NISDOMAIN=labtesting.local" >> /etc/sysconfig/network
nisdomainname
Step 3 — Configure /etc/yp.conf
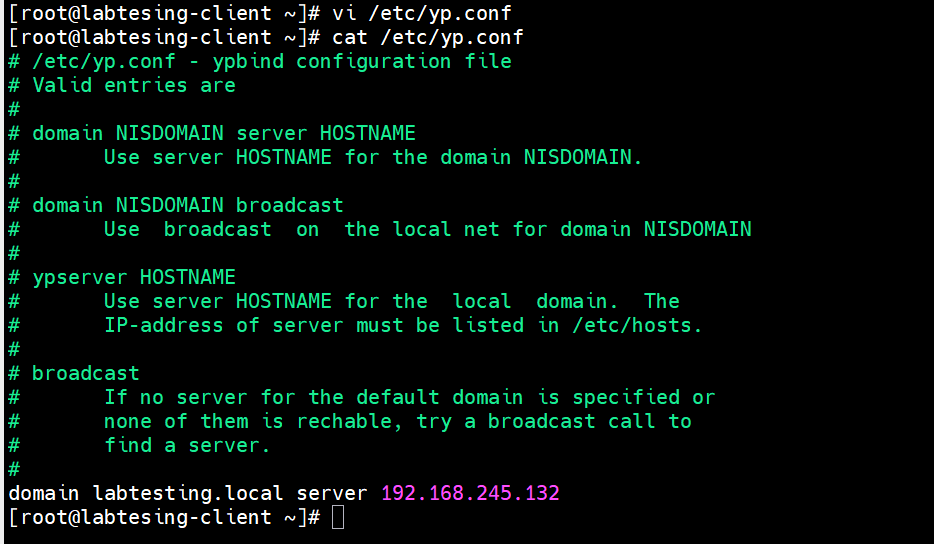
The yp.conf file tells the NIS client which server to connect to.
vi /etc/yp.conf
Add this line:
domain labtesting.local server 192.168.245.132
What this does: Tells
ypbind: "For the domainlabtesting.local, contact the server at192.168.245.132." Using the IP address is more reliable than a hostname in case DNS is not yet resolving.
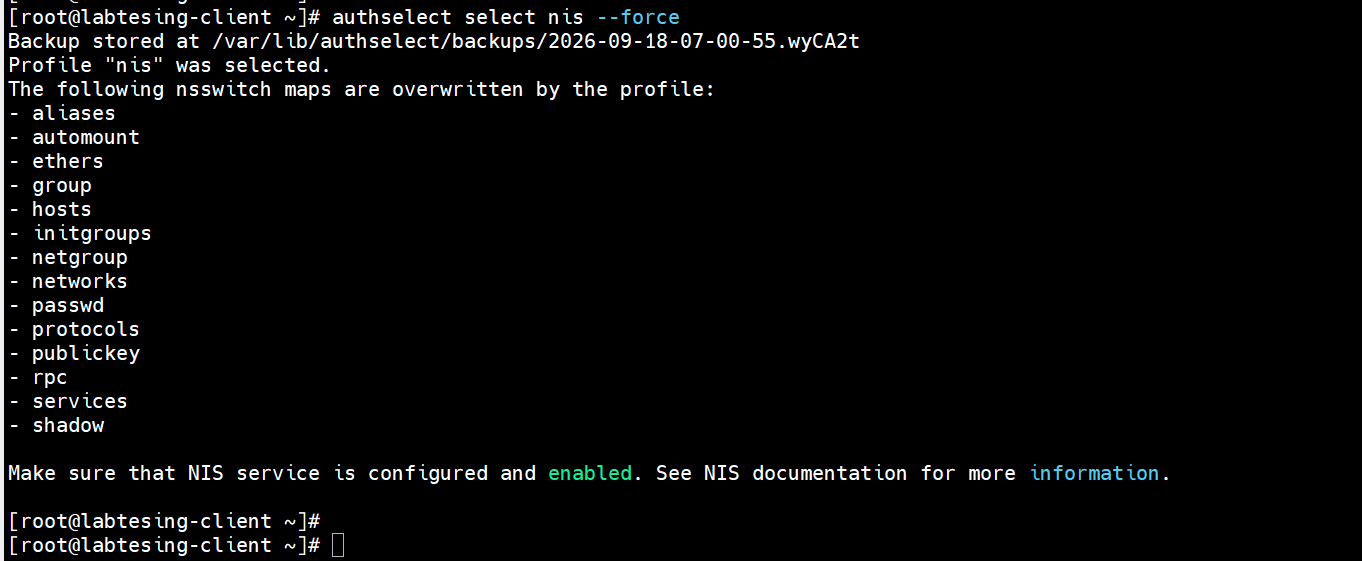
Step 4 — Configure Authentication with authselect
Rocky Linux 8 uses authselect to manage PAM and nsswitch configuration.
# Select NIS authentication profile
authselect select nis --force

# Enable auto home directory creation
authselect enable-feature with-mkhomedir

# Apply all changes
authselect apply-changes
What
authselect select nis --forcedoes: The--forceflag overwrites any existing authselect profile. This automatically updates/etc/nsswitch.confto include NIS lookups for all critical services (passwd, shadow, group, hosts, etc.).What
with-mkhomedirdoes: Configures PAM to usepam_mkhomedir, which creates/home/usernameautomatically when a NIS user logs in for the first time.


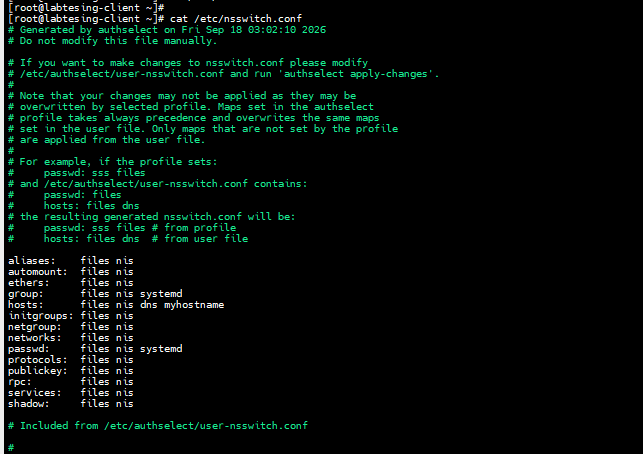
Step 5 — Verify /etc/nsswitch.conf
cat /etc/nsswitch.conf
What this shows: The
nsswitch.conffile controls the order in which the system looks up information. It should showfiles nisfor all key services — meaning: check local files first, then query NIS.
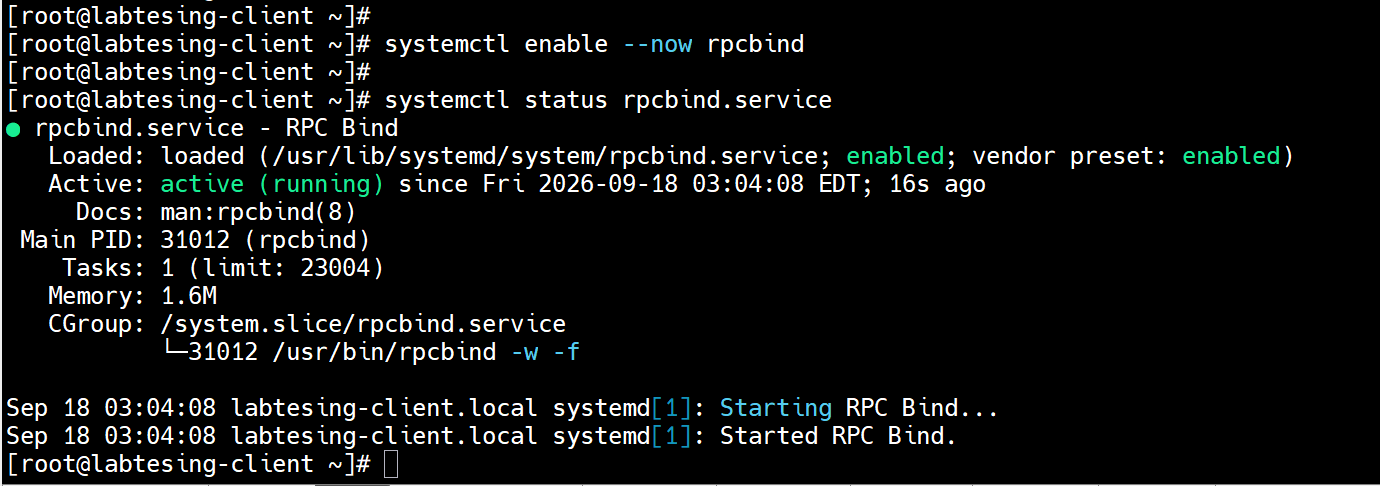
Step 6 — Enable & Start Client Services
# Start rpcbind first
systemctl enable --now rpcbind

# Start NIS client daemon
systemctl enable --now ypbind.service
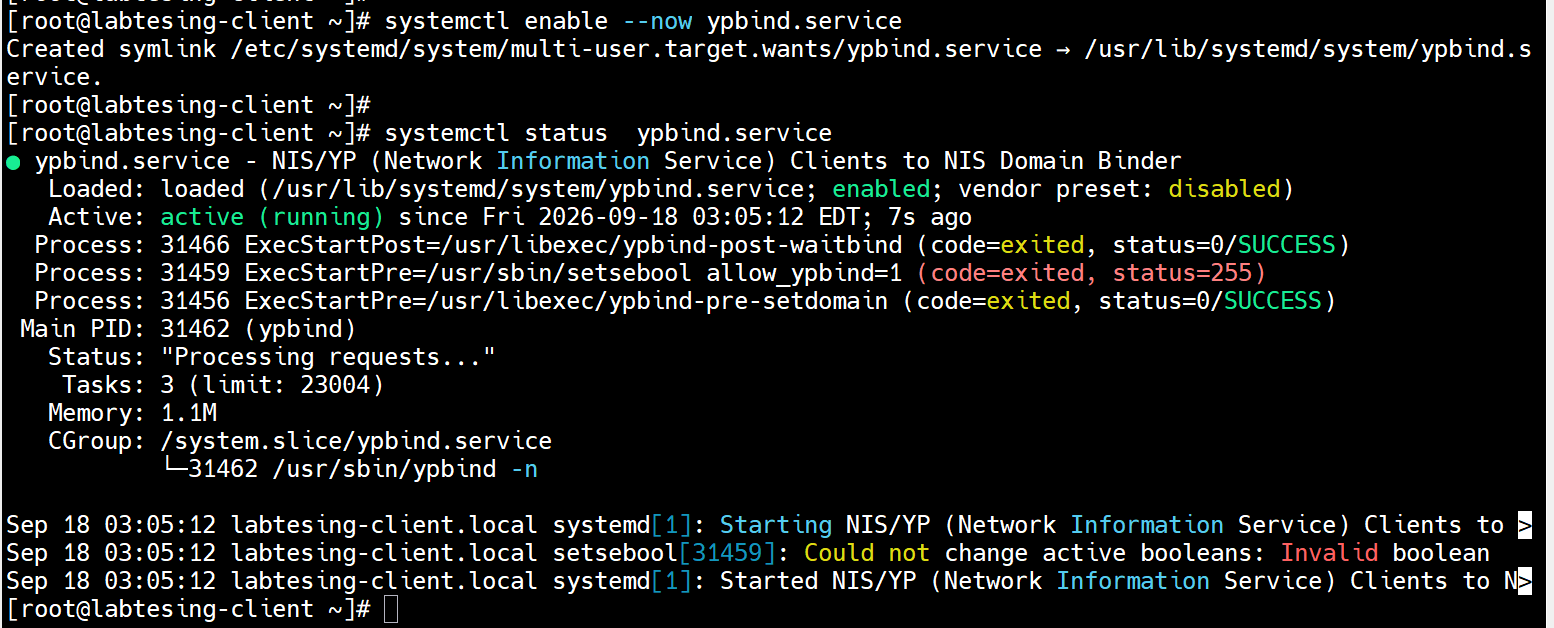
💡 Note: The
setsebool allow_ypbind=1warning (status=255) is harmless — it indicates SELinux is in permissive or disabled mode.ypbindis running successfully regardless.
4. Final Verification & Testing
Test 1 — Verify NIS Server Binding
ypwhich
What this does:
ypwhich(Yellow Pages Which) returns the IP or hostname of the NIS server the client is currently bound to. A result of192.168.245.132confirms the client is successfully connected.
 Figure 27: ypwhich — client bound to 192.168.245.132 (NIS Server) ✅
Test 2 — Create a NIS User on Server
On the NIS SERVER:
useradd nisuer01
passwd nisuer01
What this does:
useraddcreates the local user account.passwdsets the password. This user will be distributed to all NIS clients after the maps are rebuilt.
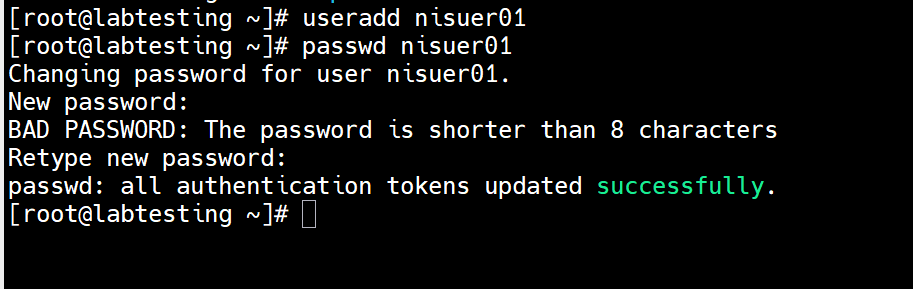 Figure 28: NIS Server — user nisuer01 created with password set successfully
Test 3 — Rebuild NIS Maps
After adding any user on the server, you MUST rebuild the NIS maps:
make -C /var/yp
What this does: Runs the NIS Makefile in
/var/yp, which reads/etc/passwd,/etc/group, etc., and rebuilds all NIS database maps. The-Cflag tellsmaketo change to that directory first. Only changed maps are updated (efficient incremental rebuild).
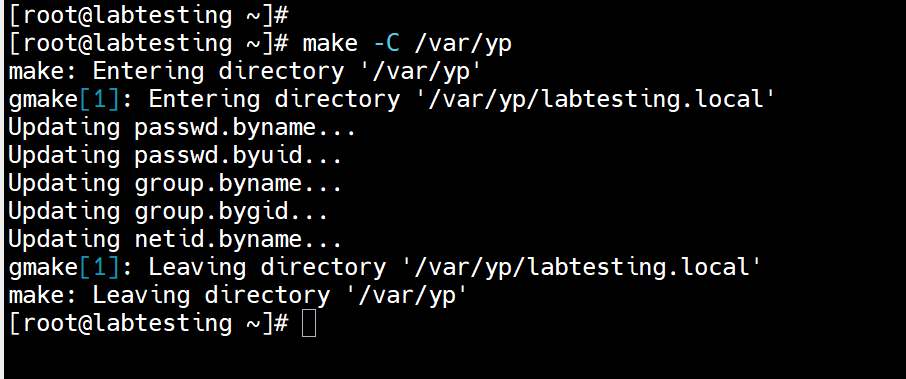 Figure 29: NIS maps rebuilt — passwd, group, netid maps updated with nisuer01
Test 4 — Verify User Visible on Client ✅
On the NIS CLIENT:
getent passwd nisuer01
What this does:
getent(get entries) queries the Name Service Switch (NSS) databases. Sincensswitch.confincludes NIS, this fetches the user entry from the NIS server. A successful result proves end-to-end NIS authentication is working.
 Figure 30: getent passwd nisuer01 — user fetched from NIS server ✅
💡 Note: The hashed password visible in the output is the SHA-512 hash (
$6$...). This is normal — the actual password is never shown in plain text.
5. Key Commands Reference
Server Commands
| Command | Purpose |
|---|---|
dnf install -y ypserv rpcbind |
Install NIS server packages |
nisdomainname <domain> |
Set NIS domain name (session) |
echo "NISDOMAIN=..." >> /etc/sysconfig/network |
Make domain persistent |
/usr/lib64/yp/ypinit -m |
Initialize NIS master server & build maps |
make -C /var/yp |
Rebuild NIS maps after any changes |
systemctl enable --now ypserv |
Enable & start NIS server daemon |
rpcinfo -p localhost |
List all registered RPC services |
Client Commands
| Command | Purpose |
|---|---|
dnf install -y ypbind rpcbind oddjob-mkhomedir |
Install NIS client packages |
authselect select nis --force |
Configure system to use NIS auth |
authselect enable-feature with-mkhomedir |
Enable auto home dir creation |
systemctl enable --now ypbind |
Enable & start NIS client daemon |
ypwhich |
Show which NIS server client is bound to |
ypcat passwd |
Display all NIS password map entries |
getent passwd <user> |
Lookup user via NSS (NIS + local) |
ypdomainname |
Display current NIS domain name |
NIS Services & Ports
| Service | Daemon | Port | Purpose |
|---|---|---|---|
| portmapper | rpcbind | 111 | RPC service registry |
| ypserv | ypserv | 751 | NIS map server |
| yppasswdd | rpc.yppasswdd | 757 | Password change service |
| ypxfrd | rpc.ypxfrd | 744 | Map transfer accelerator |
This guide demonstrated a complete NIS (Network Information Service) setup on Rocky Linux 8.10, covering both server and client configuration from scratch.
What was accomplished:
- ✅ Installed and configured
ypservas NIS master server on Rocky Linux 8.10 - ✅ Set up NIS domain
labtesting.localwith proper subnet access control - ✅ Built and initialized all NIS maps using
ypinit -m - ✅ Configured NIS client with
ypbindandauthselectNIS profile - ✅ Verified end-to-end: user created on server → visible on client via
getent
NIS provides a simple, effective way to centralize user management across Linux systems in a network — making it ideal for lab environments, small teams, and legacy system integrations.
Document prepared as part of lab practice.
*Rocky Linux 8.10 | NIS/YP |