xCAT Installation & Configuration Guide
Management Node Setup, DNS/DHCP/NTP Configuration, and Compute Node Provisioning
Rocky Linux 8.10 | Lab Validation on VMware Workstation
Prepared as a rehearsal run-book ahead of production cluster deployment
1. Purpose of This Document
This guide documents a complete, working xCAT installation and cluster-provisioning workflow, validated in a VMware lab environment before the real hardware deployment. Every command is paired with a short explanation of why it is necessary — not just what to type — so the same steps can be understood, adapted, and troubleshot on the production management node next week.
2. Environment Overview
This lab run used the following environment. Replace with production values before the real deployment.
| Field | Value |
|---|---|
| Hypervisor | VMware Workstation |
| Management Node OS | Rocky Linux 8.10 (Green Obsidian) |
| MN hostname | labtesting.local.com |
| MN static IP | 192.168.245.128 / 24 |
| VMnet used | Custom VMnet (VMware built-in DHCP disabled) |
| Compute node hostname | cnode01 |
| Compute node IP | 192.168.245.10 / 24 |
| Compute node MAC | 00:0C:29:88:E7:00 |
| OS image used | rocky8.10-x86_64-install-compute |
Phase 1 — Base OS & Network Preparation
xCAT relies on the management node having a fixed identity on the network: a resolvable hostname and a static IP that never changes. Every other service (DNS, DHCP, TFTP, HTTP) is configured against this IP, so getting it right first avoids re-configuring everything later.
1.1 Assign a static IP to the management node
Why this step matters xCAT's DHCP, DNS, TFTP and HTTP services all publish the management node's IP address to every compute node that provisions from it. If this IP changes (as it would under DHCP), every node's boot configuration, PXE files, and the xCAT site table become inconsistent, breaking provisioning cluster-wide.
How to verify ip a show ens160 — confirm the address shown is 192.168.245.128/24 and stays fixed after a reboot.
nmcli con mod ens160 ipv4.addresses 192.168.245.128/24
nmcli con mod ens160 ipv4.gateway 192.168.245.2
nmcli con mod ens160 ipv4.dns "192.168.245.128 8.8.8.8"
nmcli con mod ens160 ipv4.method manual
nmcli con up ens160

Step 1.1 — static IP confirmation (ip a show ens160)
1.2 Set the hostname
Why this step matters xCAT registers the management node's hostname into its own DNS zone and uses it inside generated kickstart files, repo URLs, and postscripts. An unset or generic hostname (e.g. localhost) causes broken self-references throughout the cluster configuration.
How to verify hostnamectl — confirm "Static hostname" shows the intended FQDN.
hostnamectl set-hostname labtesting.local.com
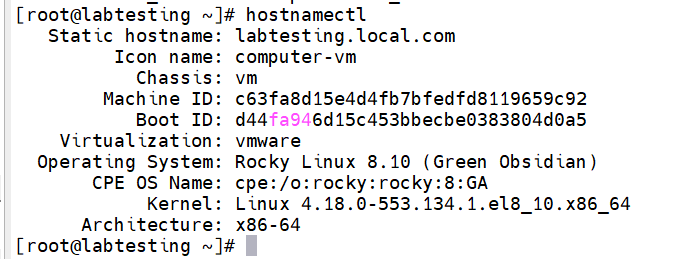
Step 1.2 — hostnamectl output
1.3 Disable SELinux
Why this step matters xCAT's daemons (xcatd, TFTP, DHCP, HTTP) write and serve files across several non-standard paths (/tftpboot, /install). SELinux's default policies do not have rules for these xCAT-specific paths, so enforcing mode blocks core services from starting — this is why xCAT officially requires SELinux disabled on the management node.
How to verify sestatus — must report "SELinux status: disabled".
vi /etc/selinux/config
# set SELINUX=disabled

reboot
sestatus   # after reboot

Step 1.3 — sestatus output
1.4 Disable the firewall
Why this step matters Provisioning depends on many ports simultaneously — TFTP (69/udp), DHCP (67-68/udp), HTTP (80), DNS (53), NFS/rsync for postscripts, and xCAT's own daemon port (3001). In a lab/private network this traffic is trusted, so the simplest and most reliable approach is disabling the firewall rather than maintaining a long allow-list that's easy to get wrong.
How to verify systemctl status firewalld.service — must show "inactive (dead)" and "disabled".
systemctl stop --now firewalld.service
systemctl disable --now firewalld.service
systemctl status firewalld.service

Step 1.4 — firewalld disabled confirmation
1.5 Enable required repositories
Why this step matters xCAT and its dependencies (e.g. Perl modules, network tools) pull packages from Rocky's PowerTools/CRB and Extras repositories, which are disabled by default on a minimal install. Without these enabled, the xCAT installer or its dependency packages fail partway through with unresolved package errors.
How to verify dnf repolist — confirm extras and powertools show as enabled.
dnf config-manager --enable extras
dnf config-manager --enable powertools

Step 1.5 — dnf repolist showing enabled repos
Phase 2 — xCAT Installation
With the base OS prepared, install the xCAT packages themselves. (If your environment provides an offline/local xCAT repo or installer script, use that here — the explanation below covers why the install matters regardless of source.)
2.1 Install xCAT
Why this step matters This installs xcatd (the management daemon), the database backend, and all supporting services (DHCP, TFTP, HTTP configuration hooks) that the rest of this guide depends on. Nothing else in this document works until this step completes successfully.
How to verify xcatd -v — confirm the daemon reports a version. systemctl status xcatd — confirm it is active.
# Example using the xCAT install script from the official repo:
wget -O - https://raw.githubusercontent.com/xcat2/xcat-core/master/xCAT-server/share/xcat/tools/go-xcat | bash -s -- install -p core
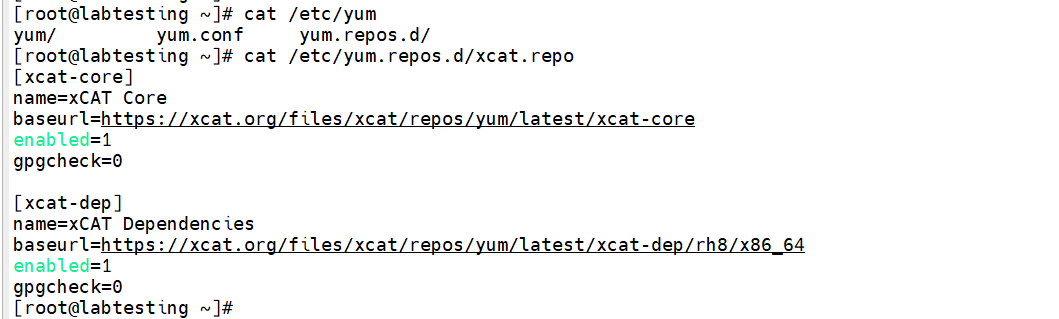
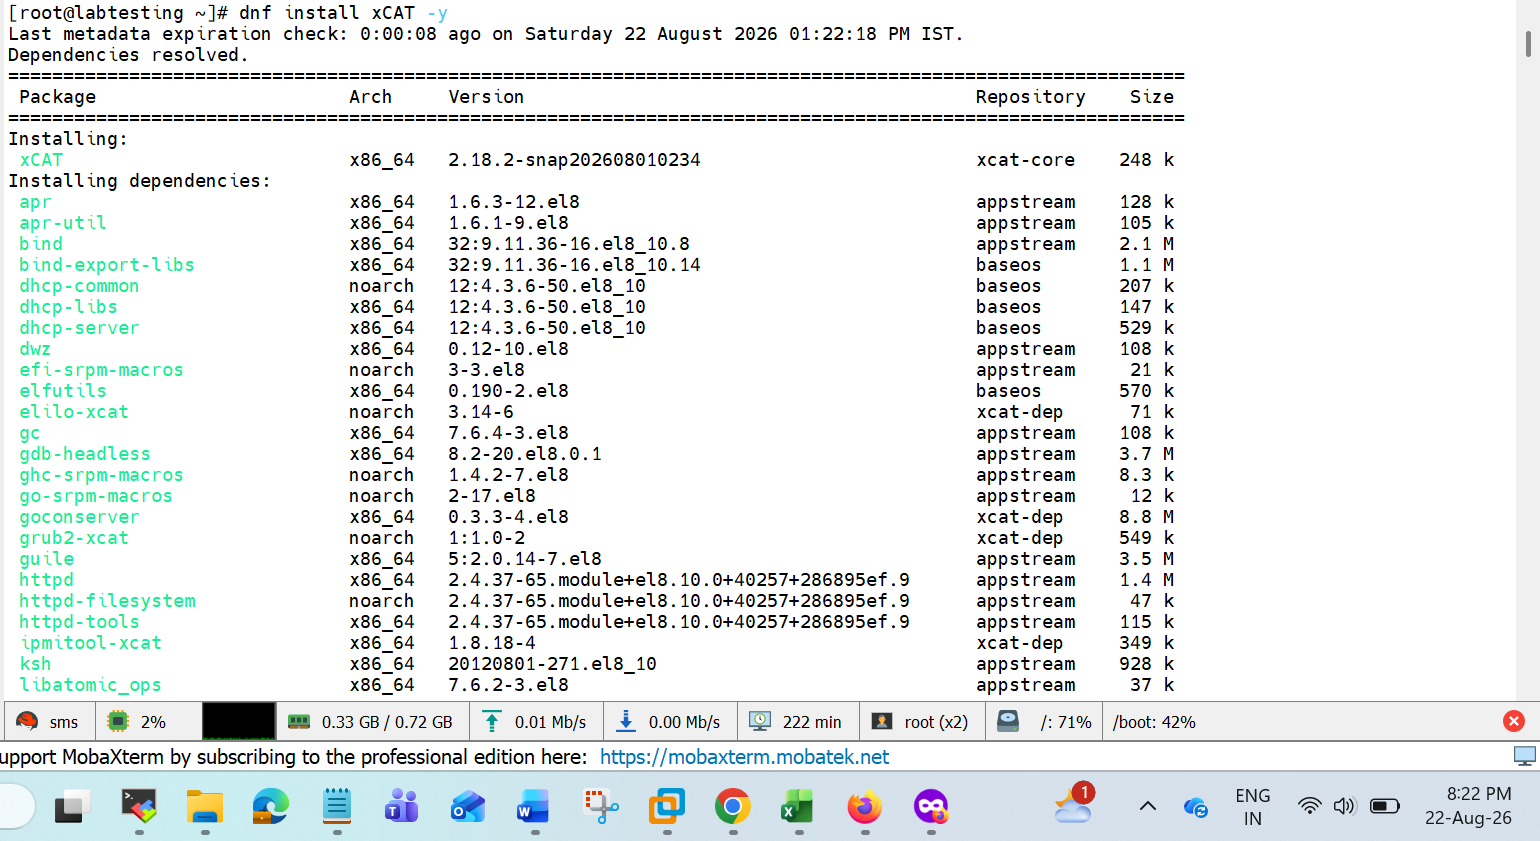
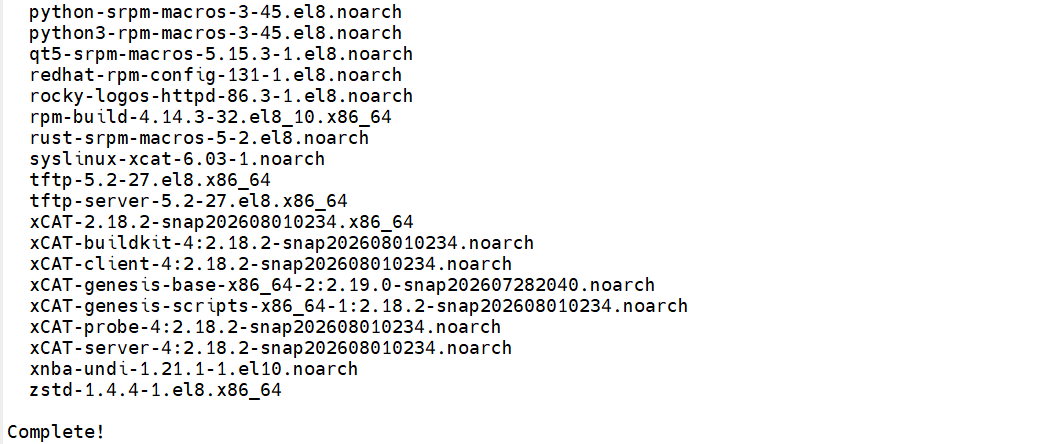
Step 2.1 — xCAT install completion
2.2 Run the built-in health probe
Why this step matters xcatprobe is xCAT's own diagnostic tool — it checks every subsystem xCAT needs (site table, passwd table, DNS, DHCP, NTP, disk space, SELinux, firewall, static IP) in one pass. Running it immediately after install gives a clear checklist of exactly what's still misconfigured, rather than discovering each gap one provisioning failure at a time.
How to verify Review the SUMMARY section at the bottom of the output — each FAIL/WARN line maps directly to a step in Phase 3 below.
xcatprobe xcatmn
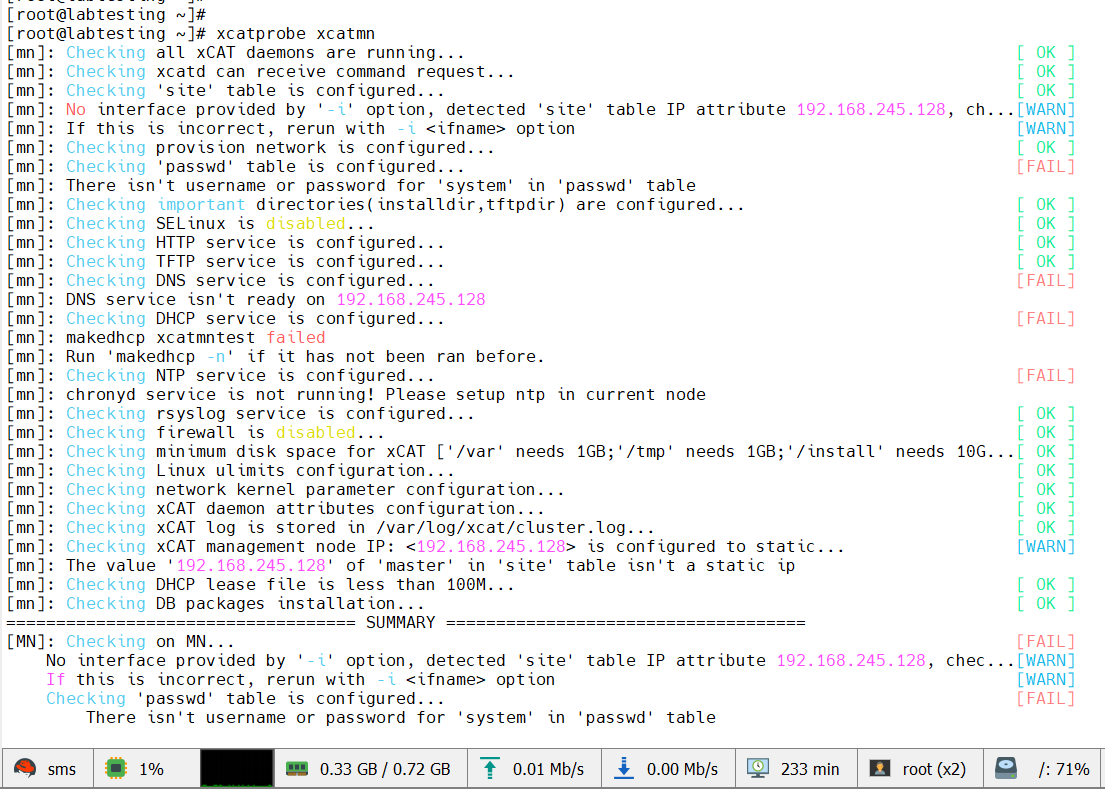

Step 2.2 — initial xcatprobe xcatmn output (before fixes)
Phase 3 — Core Service Configuration
This phase resolves every FAIL/WARN reported by xcatprobe: authentication credentials, DNS, DHCP, and NTP. These four services are what actually let a blank compute node find, boot from, and trust the management node.
3.1 Configure the passwd table
Why this step matters The system entry in the passwd table is what xCAT uses for out-of-band management (BMC/IPMI logins) and certain internal service authentication. Without it, xcatprobe fails immediately and several remote-management commands (rpower, rvitals) have no credentials to authenticate with on real hardware.
How to verify tabdump passwd — confirm a system row exists with username and password set.
chtab key=system passwd.username=root passwd.password=<your_password>

Step 3.1 — tabdump passwd output
3.2 Confirm the site table matches your network
Why this step matters The site table is xCAT's central configuration record — master tells every subsystem (DHCP, DNS, TFTP) which IP is the management node, and domain is used to build every node's FQDN and DNS zone. If these don't match the actual static IP and intended domain, DNS and DHCP generation (makedns, makedhcp) will produce records that don't match reality.
How to verify Re-run the tabdump grep — master should equal your static IP, domain should equal your intended domain.
tabdump site | grep -E "master|domain|forwarders|nameservers"
chdef -t site domain="labtesting.local.com"
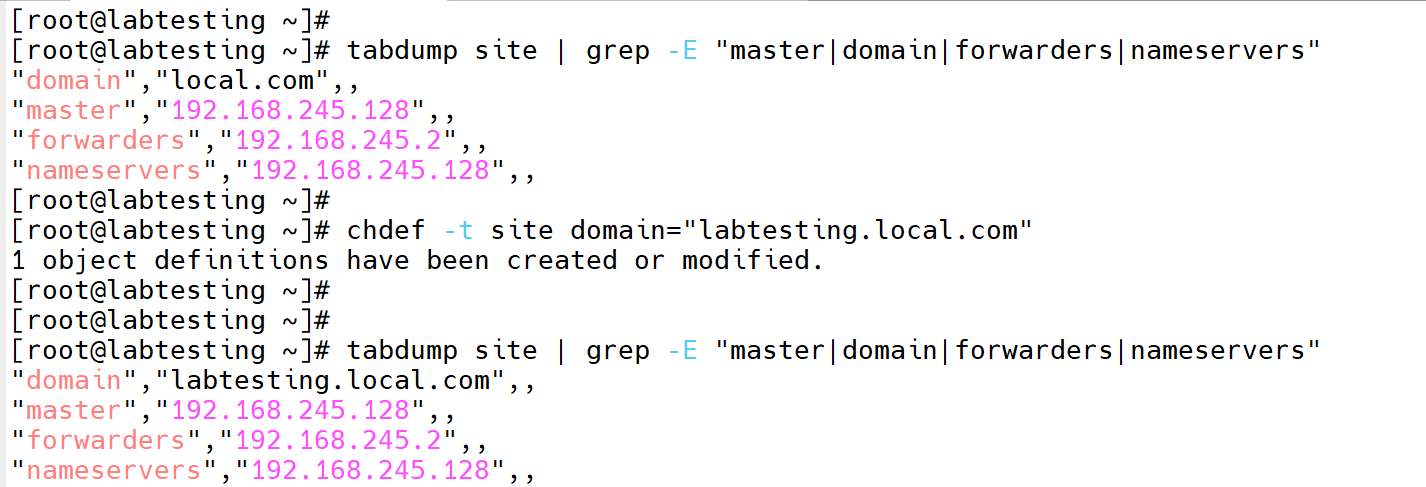
Step 3.2 — site table values
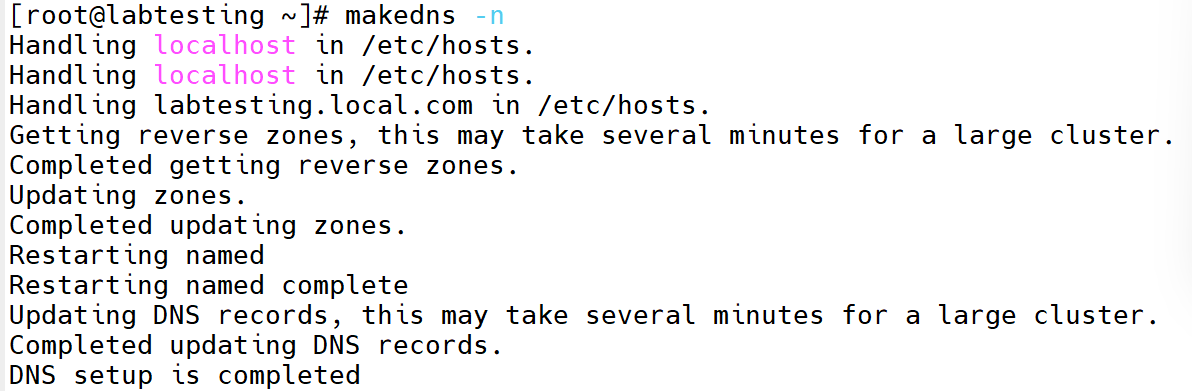
3.3 Configure and start DNS (named)
Why this step matters Compute nodes and the management node need to resolve each other by hostname during provisioning (kickstart files, postscripts, and repo URLs all reference hostnames, not raw IPs). makedns -n generates the forward and reverse DNS zone files for your domain/subnet from the site and hosts tables — without this, named runs but has no zone data for your cluster's names.
How to verify dig @192.168.245.128 <hostname> or nslookup <hostname> 192.168.245.128 — should resolve to the correct IP. named-checkconf /etc/named.conf should return no output (no errors).
systemctl enable --now named
makedns -n
systemctl restart named
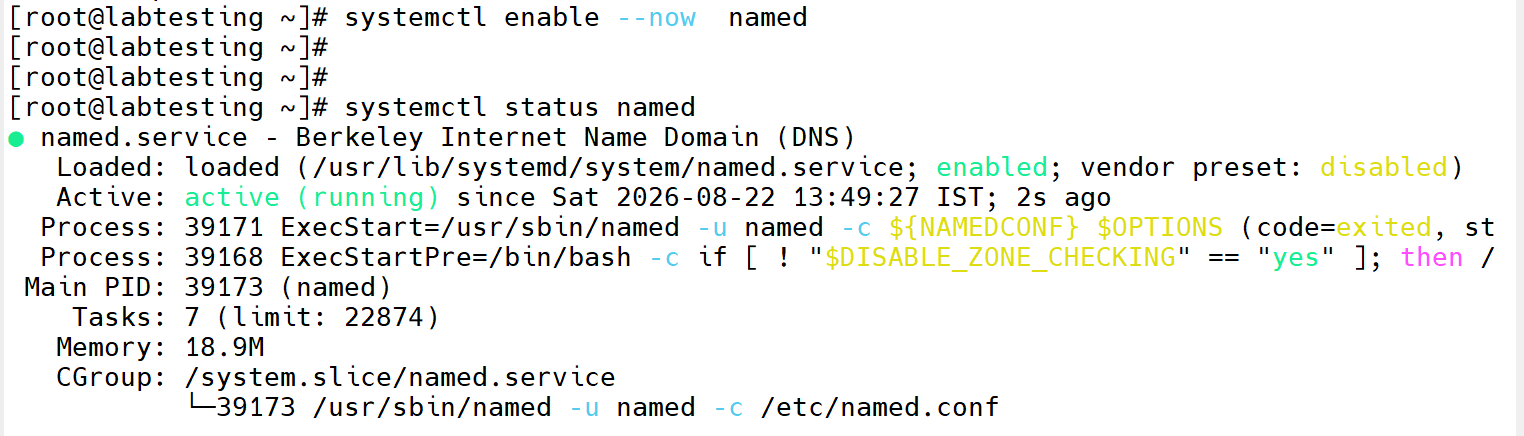
Step 3.3 — makedns -n output and dig/nslookup test
3.4 Configure and start DHCP
Why this step matters This is how a blank compute node with no OS gets an IP address and finds the PXE boot server in the first place. makedhcp -n rebuilds dhcpd.conf from the xCAT networks table; -a adds all currently defined nodes as DHCP host reservations, so each node always gets the same IP rather than a random lease.
How to verify systemctl status dhcpd — must show "active (running)". Check it is listening on the correct interface in the log output.
dnf install -y dhcp-server
makedhcp -n
makedhcp -a
systemctl status dhcpd
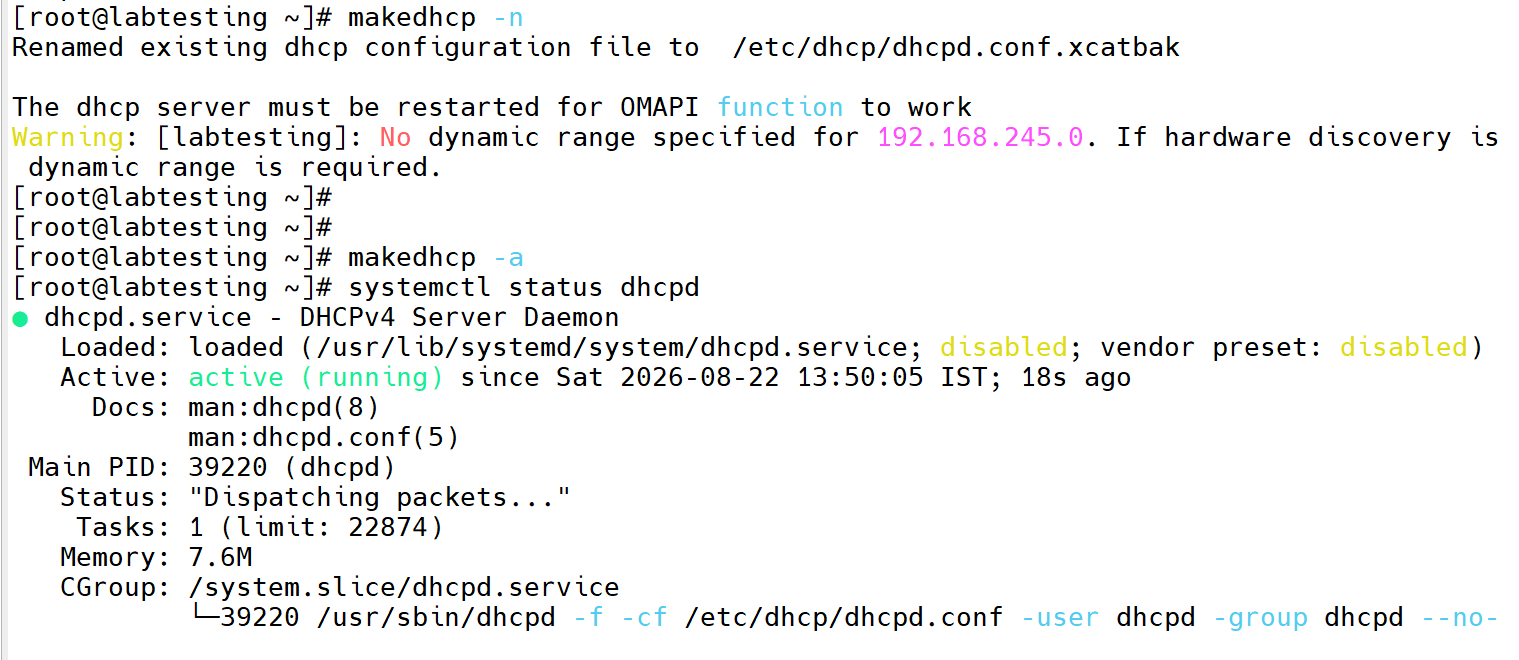
Step 3.4 — dhcpd active status
3.5 Configure and start NTP (chronyd)
Why this step matters Kickstart installs, certificate validation, and log correlation across the management node and compute nodes all depend on clocks being in sync. A management node with drifted time can cause SSL/TLS handshake failures and confusing, out-of-order log timestamps when diagnosing a failed provision.
How to verify chronyc sources — should list upstream NTP servers with a * or ^* marking the currently selected source.
systemctl enable --now chronyd
chronyc sources
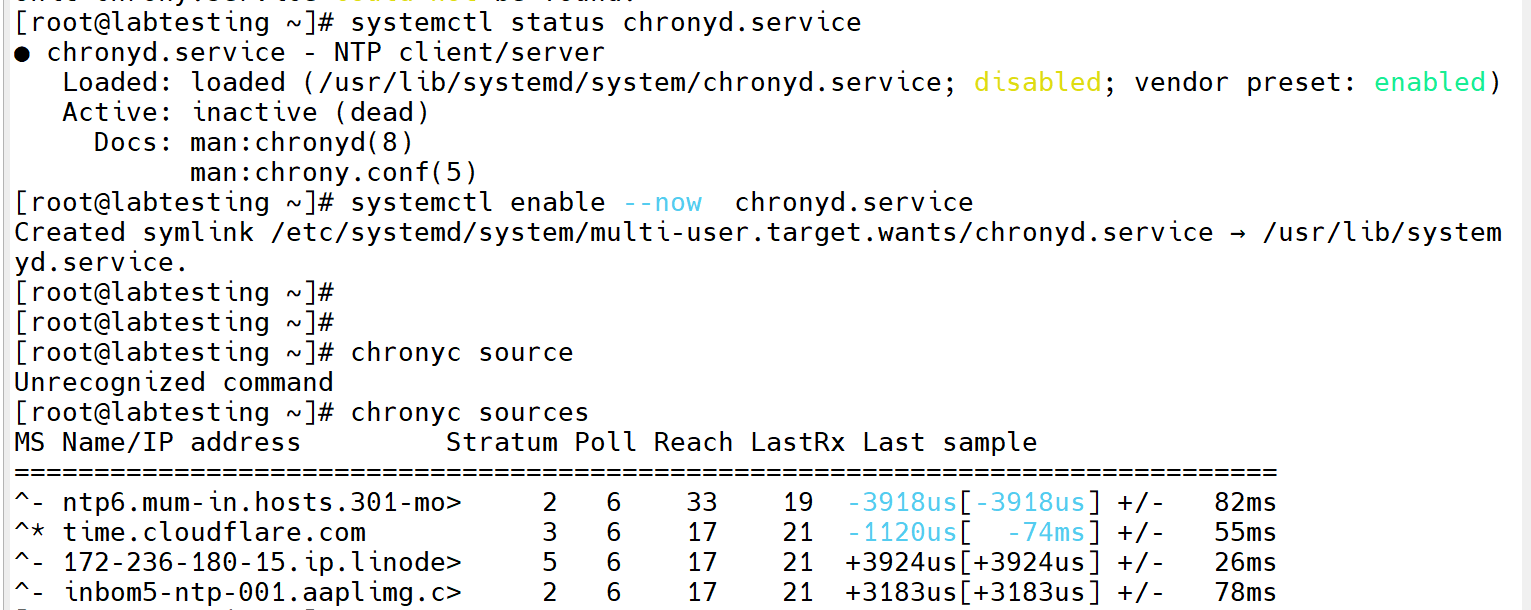
Step 3.5 — chronyc sources output
3.6 Re-run the probe to confirm all services pass
Why this step matters Passing -i ens160 explicitly (instead of letting xcatprobe auto-detect) removes the harmless "no interface provided" warning and confirms the probe is checking the exact interface your cluster will provision on — important once there is more than one NIC on the management node.
How to verify SUMMARY section should show [MN]: Checking on MN... [OK] with no remaining FAIL lines.
xcatprobe xcatmn -i ens160
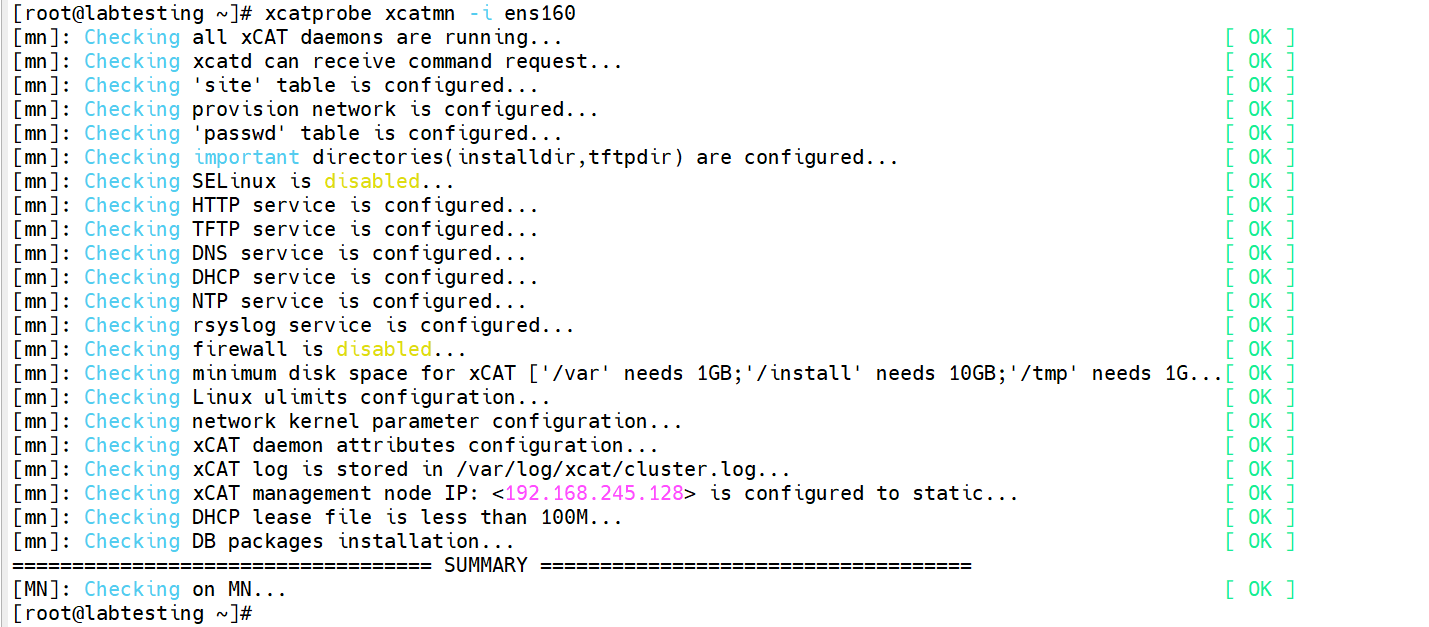
Step 3.6 — final clean xcatprobe xcatmn output
Phase 4 — OS Image Preparation
Compute nodes install their OS by pulling packages and a kickstart file from the management node, not from a physical disc. This phase turns a Rocky Linux ISO into an xCAT-managed OS image and installable repository.
4.1 Copy the ISO into xCAT's OS image repository
Why this step matters copycds extracts the ISO's package repositories (BaseOS, AppStream) into /install and registers five osimage definitions (install, netboot, statelite, stateful-mgmtnode, service variants) in xCAT's database. These definitions are what nodeset later points a compute node at — without them, xCAT has no OS to install.
How to verify lsdef -t osimage | grep rocky — should list rocky8.10-x86_64-install-compute among others.
copycds /path/to/Rocky-8.10-x86_64-dvd1.iso
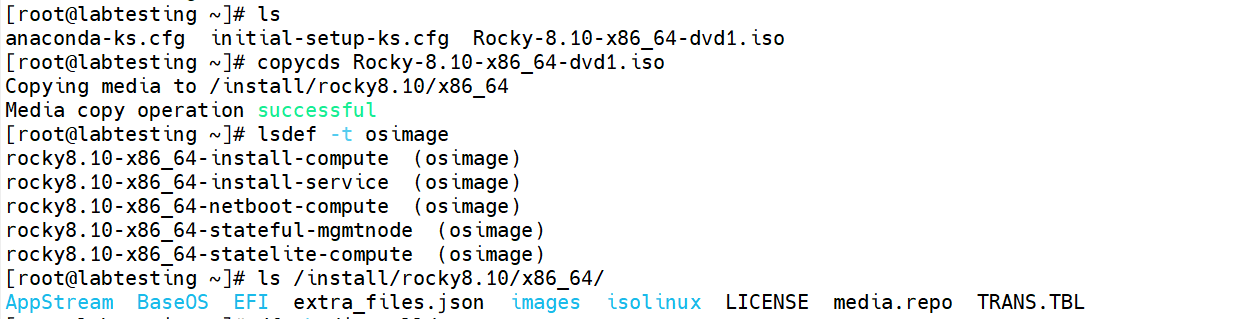
Step 4.1 — copycds success + lsdef -t osimage output
Note: If
copycdsreports "could not identify the ISO" or an ARCH error, the ISO checksum should be verified against the official Rocky Linux CHECKSUM file first — a partially downloaded or corrupted ISO produces exactly these symptoms, along with cpio "Read error" / "I/O error" messages if the copy is retried anyway.
Phase 5 — Compute Node Definition & Provisioning
This is where an individual physical (or virtual) machine is registered with xCAT and told which OS image to install.
5.1 Define the node
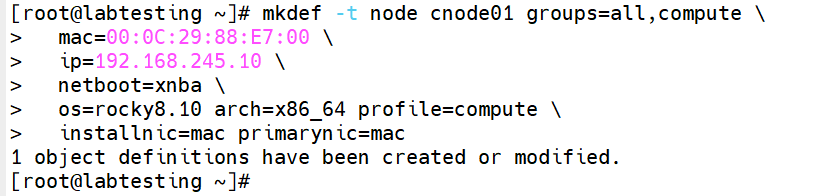
Why this step matters This creates the node's record in xCAT's database: its MAC address (used to identify it at DHCP/PXE time), its intended static IP, and which OS/profile to install. installnic=mac and primarynic=mac tell xCAT to match the node by MAC address rather than assuming a specific NIC name, which varies by hardware.
How to verify lsdef cnode01 — confirm all attributes set above are listed back correctly.
mkdef -t node cnode01 groups=all,compute \
  mac=00:0C:29:88:E7:00 \
  ip=192.168.245.10 \
  netboot=xnba \
  os=rocky8.10 arch=x86_64 profile=compute \
  installnic=mac primarynic=mac
Step 5.1 — lsdef cnode01 output
5.2 Publish the node into hosts, DNS, and DHCP
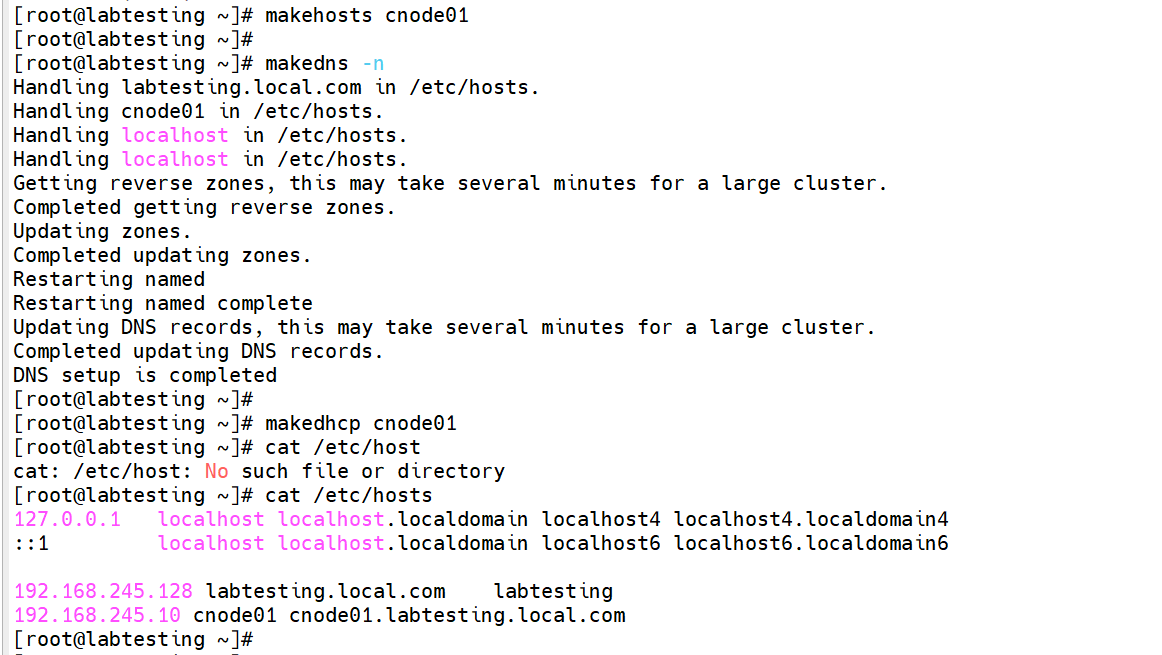
Why this step matters Defining a node in xCAT's database alone does not make it reachable — these three commands push that definition out to the actual services. makehosts adds the /etc/hosts entry, makedns regenerates the zone files to include it, and makedhcp adds a DHCP host reservation tied to its MAC so it always receives its assigned IP rather than a random lease.
How to verify grep cnode01 /etc/hosts and grep -A3 "<node MAC>" /etc/dhcp/dhcpd.conf — both should show the correct hostname/IP/MAC mapping.
makehosts cnode01
makedns -n
makedhcp cnode01
Step 5.2 — hosts + dhcpd.conf entries for the node
5.3 Stage the node for installation
Why this step matters nodeset tells xCAT which OS image the node should install the next time it PXE boots, and writes the corresponding boot configuration into /tftpboot for that node's MAC. This is the step that actually connects "this specific node" to "this specific OS image" at boot time — without it, a node that PXE boots simply gets no provisioning instructions.
How to verify nodeset cnode01 stat — should report the staged osimage name rather than "offline".
nodeset cnode01 osimage=rocky8.10-x86_64-install-compute
nodeset cnode01 stat

Step 5.3 — nodeset stat output
5.4 Power on and boot the node from network
On a VM: power on and force the boot menu (Esc/F2) to select network boot. On real hardware with a configured BMC, this step is replaced by:
rpower cnode01 boot # for real hardware
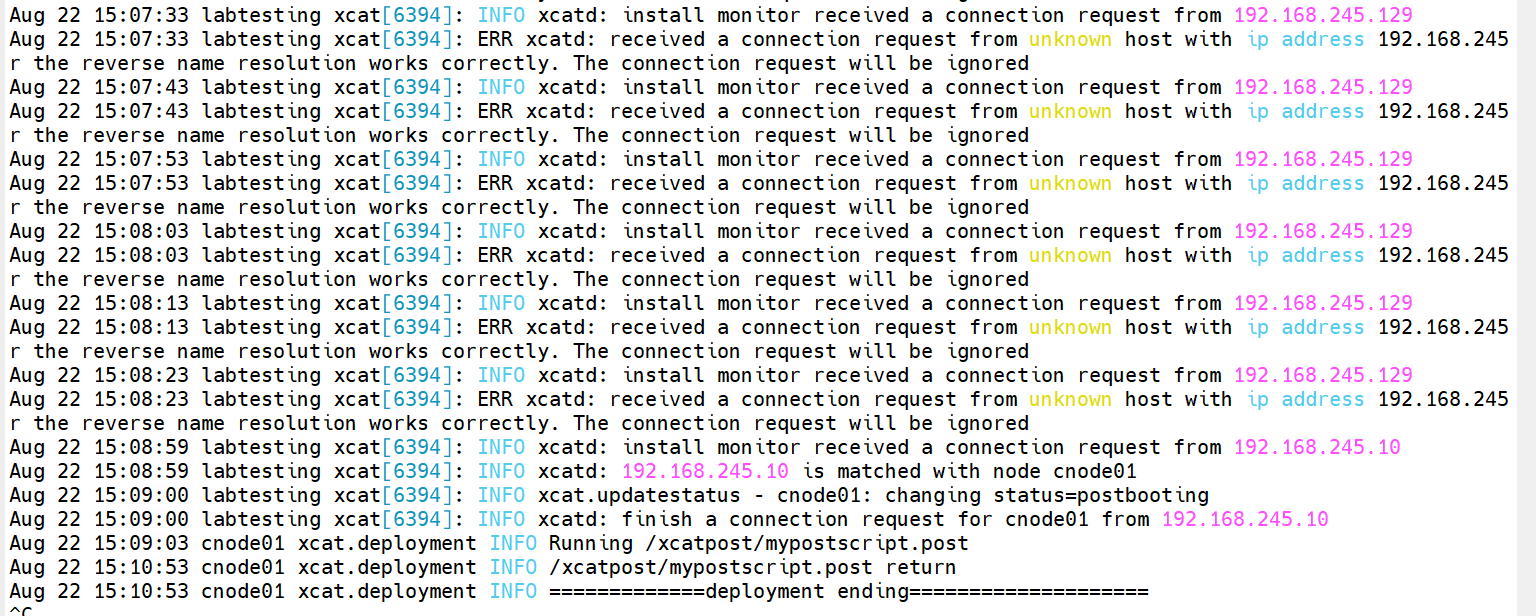
Why this step matters This is the moment the whole pipeline is exercised end-to-end: the node broadcasts a DHCP request, xCAT's dhcpd answers with an IP and the TFTP boot file location, the node downloads the bootloader/kernel/initrd over TFTP/HTTP, and Anaconda begins an unattended kickstart install using the repository copied in Phase 4.
How to verify tail -f /var/log/xcat/cluster.log on the management node, and watch the node's console directly, to confirm each stage completes.
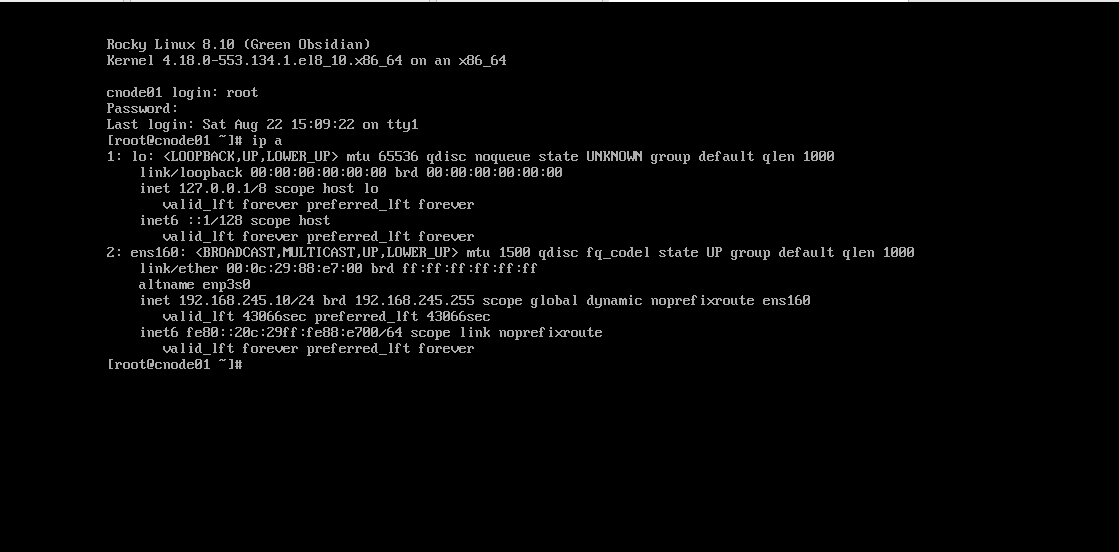
Step 5.4b — node console showing successful login prompt after install
Phase 6 — Post-Install Validation
A node that installed successfully still needs to be confirmed as manageable — i.e. that xCAT can run commands on it remotely, which is how the rest of cluster configuration (postscripts, software deployment, monitoring agents) gets applied.
6.1 Push SSH trust from the management node
Why this step matters xdsh (xCAT's parallel remote-shell tool) authenticates via SSH keys, not passwords, for both security and to allow commands to run across hundreds of nodes without interactive prompts. This step copies the management node's public key into the new node's authorized_keys — normally done automatically by a postscript during install, but re-runnable here if it was skipped.
How to verify xdsh cnode01 date — should return the node's current date/time with no password/permission error.
xdsh cnode01 -K
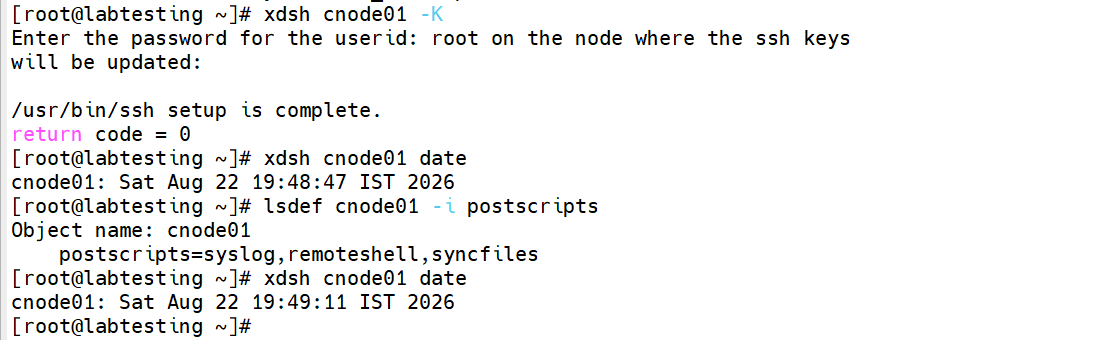
Step 6.1 — successful xdsh cnode01 date output
6.2 Confirm node membership and status
Why this step matters This is the final confirmation that the node is not just installed, but correctly tracked by xCAT as a manageable member of the compute group — which is the group used later to run commands, deploy software, or reinstall many nodes at once.
How to verify nodels compute — lists cnode01. lsdef cnode01 -i status — reports a live/booted status, not "install" or "offline".
nodels compute
lsdef cnode01 -i status
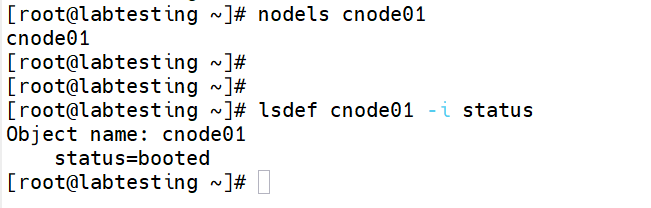
Step 6.2 — nodels and status output
Appendix A — Issues Hit During This Lab Run & Fixes
Kept here so the same issues are recognized instantly on the production cluster instead of re-diagnosed from scratch.
| Symptom | Cause | Fix |
|---|---|---|
copycds: "could not identify the ISO" |
ISO's version string wasn't auto-detected. | Retry with explicit flags: copycds <iso> -n rocky8.10 -a x86_64. If it still fails, the ISO copy is likely corrupted (see next row). |
cpio "Read error" / "I/O error" during copycds |
The ISO file on disk was corrupted or incomplete (e.g. copied from a network share mid-transfer). | Verify sha256sum against Rocky's official CHECKSUM file; re-copy the ISO to local disk (e.g. into /root) and retry copycds from there. |
nodeset cnode01 install → "options have been deprecated" |
Newer xCAT versions removed the install/netboot/statelite keywords. | Use nodeset cnode01 osimage=<osimage_name> instead. |
| VM installer hits NVMe "Data Transfer Error" / "I/O error" on a brand-new empty disk | Known VMware Workstation NVMe controller emulation bug with the Linux kernel driver used during install. | Remove the NVMe disk in VM settings and re-add it as a SCSI (LSI Logic) disk instead. |
dracut-initqueue: "No space left on device" during install |
Downstream symptom of the NVMe I/O errors above corrupting the install staging area — not genuinely low disk space. | Fixed automatically once the disk controller is switched to SCSI; also bump VM RAM to 4GB to be safe. |
xdsh cnode01 date → "Permission denied (publickey...)" |
SSH key trust between MN and node wasn't established (postscript didn't run, or ran before keys were ready). | Run xdsh cnode01 -K to push the key manually, or chdef cnode01 postscripts=remoteshell && updatenode cnode01 -P remoteshell to re-run just that postscript. |
Appendix B — Production Deployment Deltas
What will differ when running this same procedure against the real cluster next week:
- Power control: real hardware uses
mgt=ipmiwith BMC credentials inmkdef, andrpower <node> bootinstead of manually forcing PXE boot in a VM console. - Bulk node definition: with multiple compute nodes, define them via a stanza file and
nodeadddefrather than onemkdefcommand per node. - Real NICs/MACs: replace the VMware-generated
00:0C:29:xx:xx:xxMAC addresses with the actual NICs' MAC addresses. - Network scale: confirm the
networkstable'sdynamicrangeis set appropriately if hardware discovery (rather than pre-defined MACs) will be used. - Disk controller concerns specific to VMware's NVMe emulation (Appendix A) do not apply to physical hardware.