Slurm Job Scheduler Installation & Configuration Guide
Munge Authentication, OpenHPC Repositories, Slurm Controller & Client
Rocky Linux 8.10 | xCAT-Provisioned Cluster | Lab Validation
Includes every real error encountered and its fix, for reuse on the production cluster
1. Purpose & How to Use This Guide
This guide documents a complete, working installation of Munge authentication and the Slurm job scheduler (via OpenHPC packages) across an xCAT-managed management node and compute node group. It reflects the actual commands run and actual errors encountered during lab validation — including several that are easy to hit again on the production cluster.
Each step includes:
- Command — the exact command to run.
- Why this step matters — the reason the step is required.
- How to verify — a command confirming the step worked before moving on.
- Pitfall we hit — (where applicable) the actual error seen during this lab run and its fix.
2. Environment Overview
| Field | Value |
|---|---|
| Master / controller node | labtesting.local.com (192.168.245.128) |
| Compute node | cnode01 (192.168.245.10), xCAT group: compute |
| OS | Rocky Linux 8.10 |
| OpenHPC series used | 2.x (EL8) — NOT 3.x, which targets EL9 only |
| ohpc-release source | github.com/openhpc/ohpc release v2.4.GA (repos.openhpc.community mirror path 404'd) |
| Slurm version installed | 25.05.8 (via slurm-ohpc / ohpc-slurm-server / ohpc-slurm-client) |
| Cluster name | Labtesting-hpc |
| Partition name | normal (OpenHPC's default; became the live partition despite an earlier plan to name it 'compute') |
Phase 1 — Munge Authentication
Slurm does not authenticate its own cluster communication — it delegates this to Munge, a shared-secret system. Every node must have the exact same key, or the controller and compute daemons will reject each other's messages. This must be working before Slurm is installed.
1.1 Install and initialize Munge on the master
Why this step matters The Munge key is the shared secret every daemon (slurmctld, slurmd) uses to sign and verify messages between nodes. It must be generated once on the master and distributed byte-identical to every node — never regenerated per node.
How to verify munge -n | unmunge — should return STATUS: Success (0) with a current timestamp.
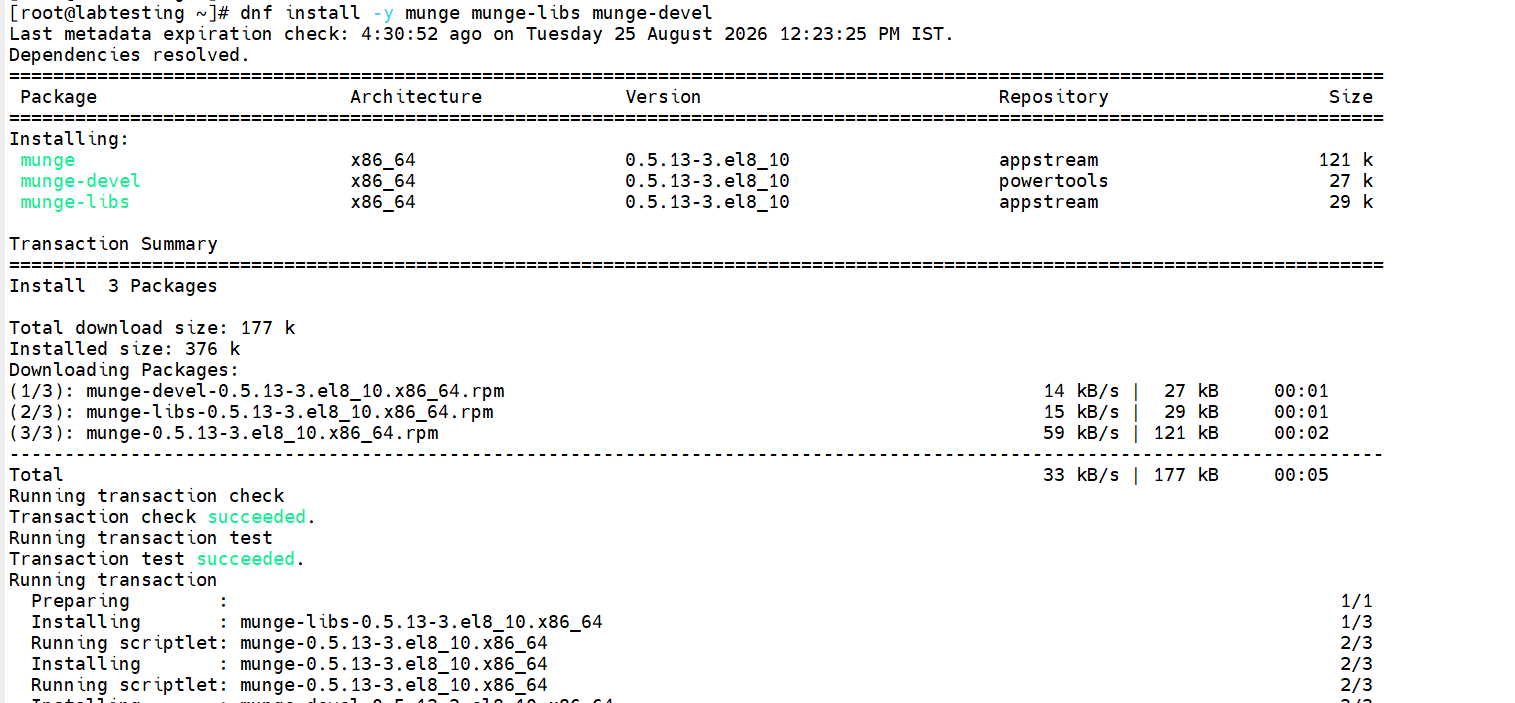
dnf install -y munge munge-libs munge-devel
/usr/sbin/create-munge-key
chown munge:munge /etc/munge/munge.key
chmod 400 /etc/munge/munge.key
systemctl enable --now munge
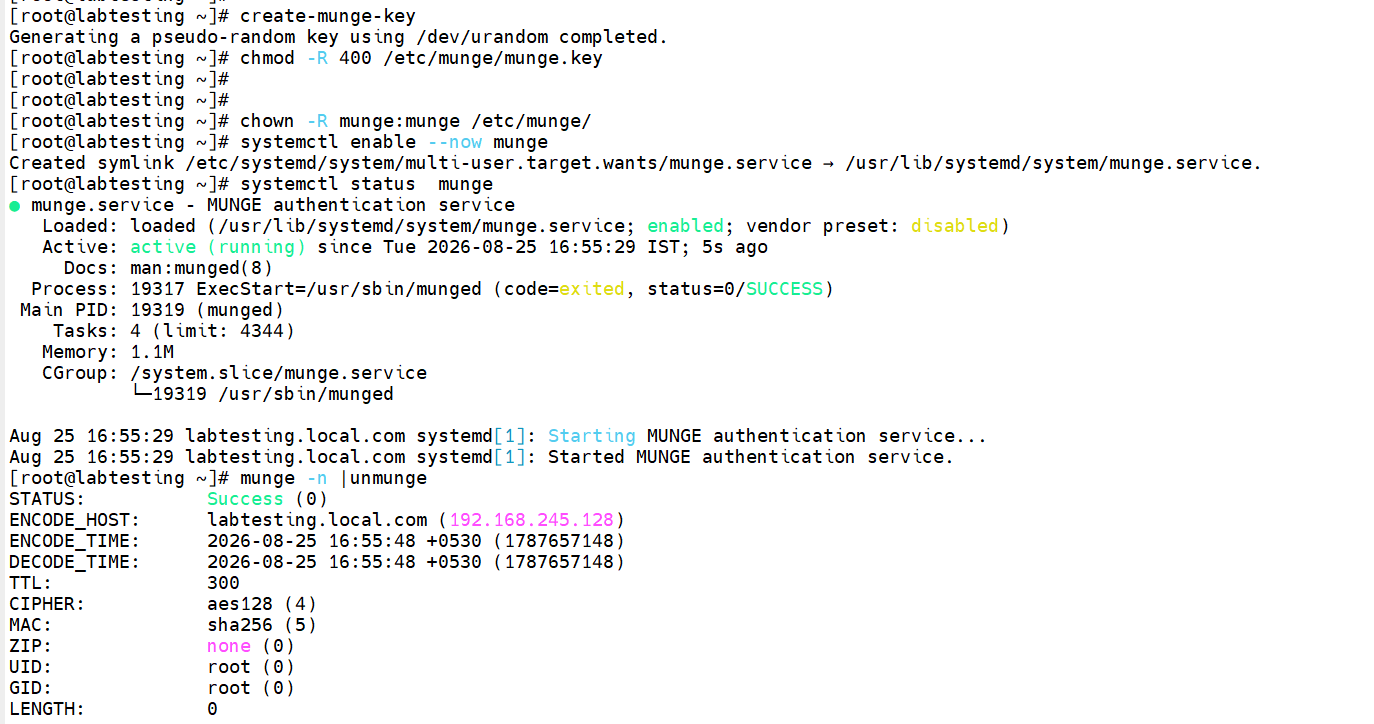
Step 1.1 — munge -n | unmunge on master
1.2 Create a postscript to distribute the key to compute nodes
Why this step matters xCAT's /install/postscripts directory is already served over HTTP (the same mechanism postscripts themselves use during provisioning), so this reuses existing, working infrastructure instead of setting up a new transport.
How to verify Not applicable yet — this step only creates the postscript file. Note: if the script above doesn't copy the munge key, copy it manually using scp or xdsh to all nodes or the required nodes.
mkdir -p /install/postscripts/files
cp /etc/munge/munge.key /install/postscripts/files/munge.key
cat > /install/postscripts/setup_munge << 'EOF'
#!/bin/bash
dnf install -y munge munge-libs
MASTER_IP=$(getent hosts $MASTER | awk '{print $1}')
curl -s -o /etc/munge/munge.key http://${MASTER_IP}/install/postscripts/files/munge.key
chown munge:munge /etc/munge/munge.key
chmod 400 /etc/munge/munge.key
systemctl enable --now munge
echo "munge configured from master key"
EOF
chmod +x /install/postscripts/setup_munge
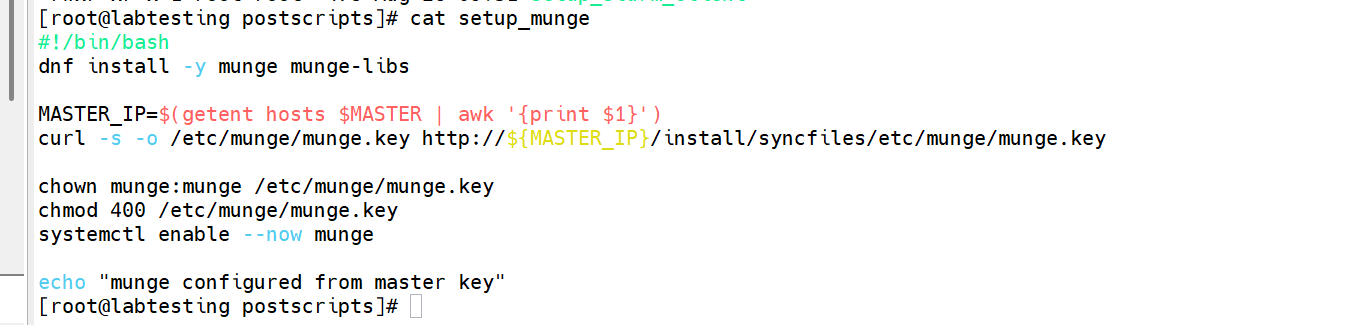
Step 1.2 — setup_munge postscript contents
1.3 Push Munge to the compute group and verify
Why this step matters This confirms each compute node can encode and decode its OWN credential locally — a necessary but not sufficient test (see the pitfall below).
How to verify Both master and compute node should independently report STATUS: Success (0).
chdef compute -p postscripts=setup_munge
updatenode compute -P setup_munge
xdsh compute "systemctl status munge"
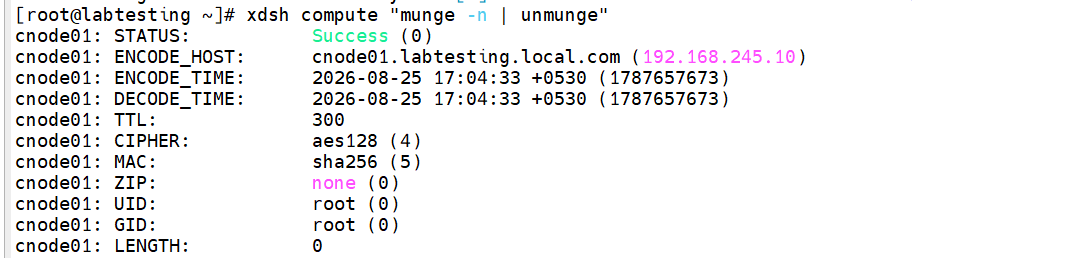
xdsh compute "munge -n | unmunge"
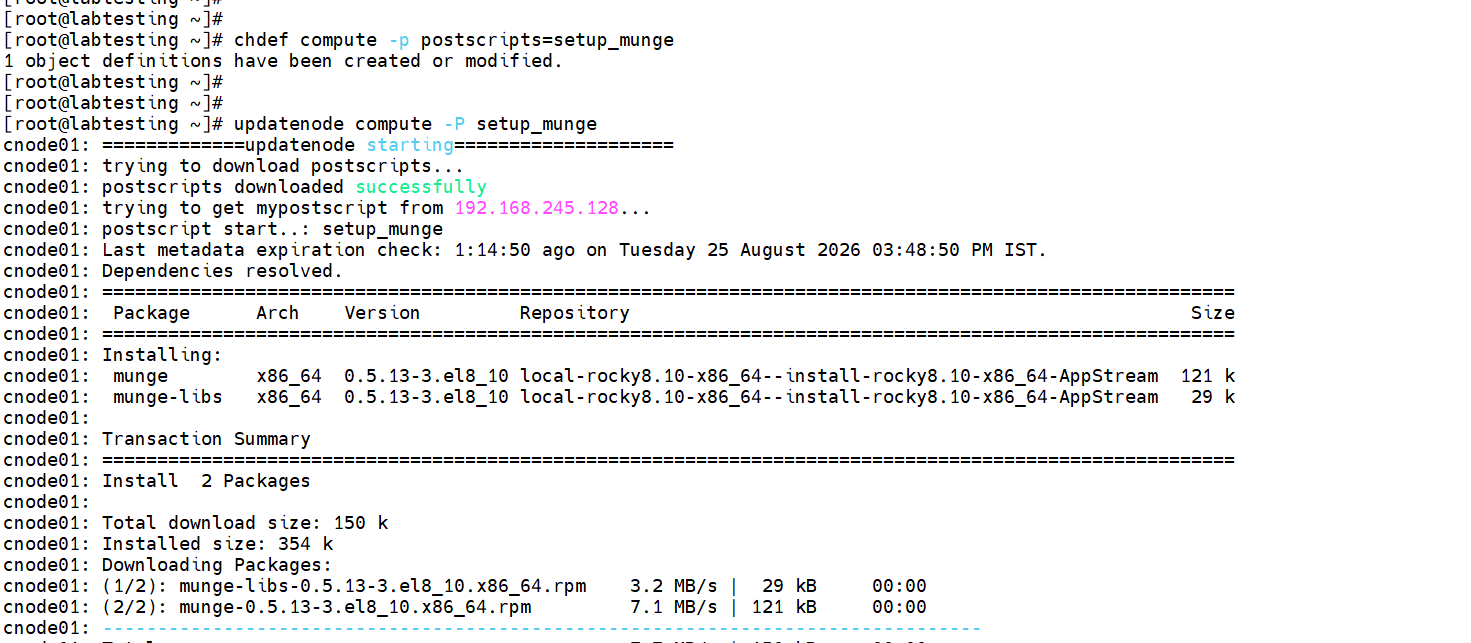
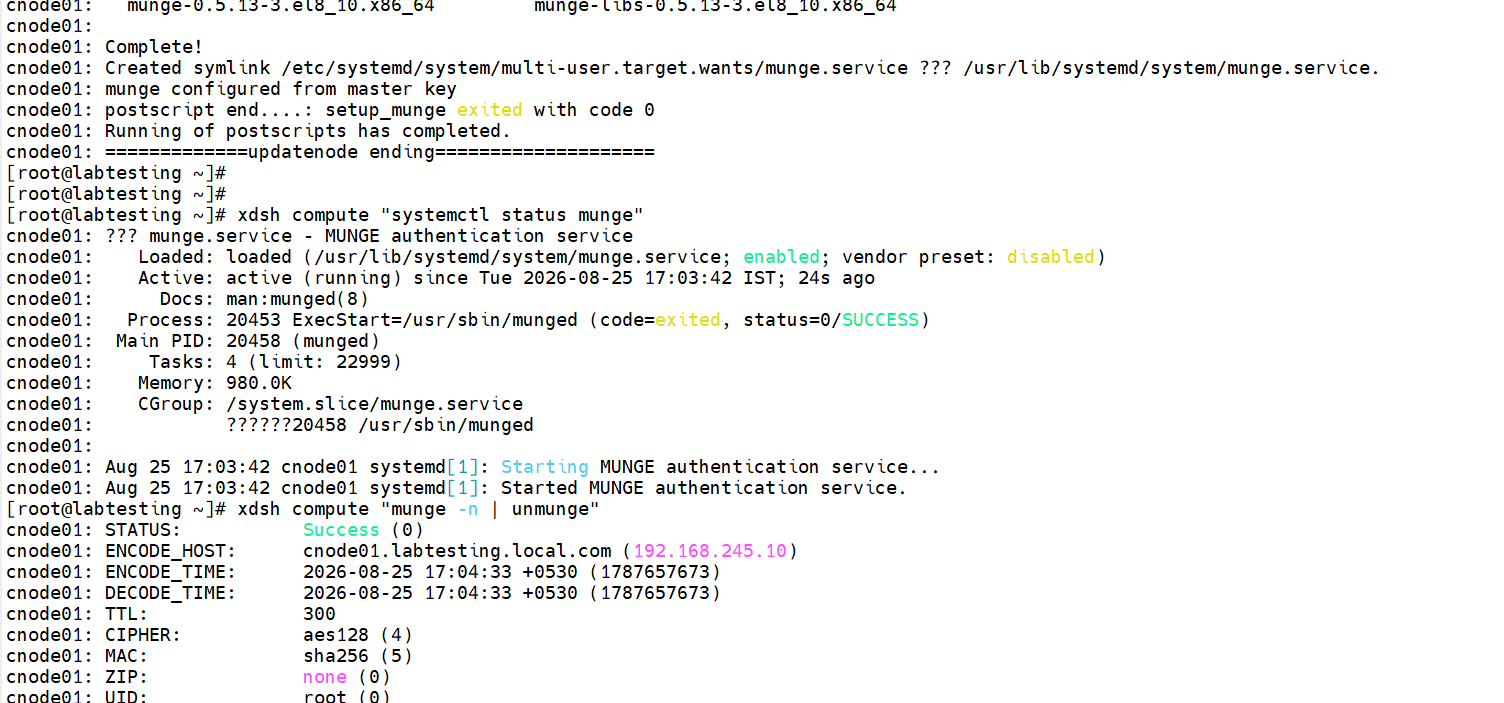
Step 1.3 — xdsh compute munge -n | unmunge
1.4 Cross-node verification (the real test)
Why this step matters Decoding your OWN key locally always succeeds, even with the wrong key file, because encode and decode use the same (possibly wrong) key on that one node. The only test that actually proves the master and compute node share the SAME key is encoding on one and decoding on the other. This is exactly what Slurm does internally on every node registration.
Pitfall we hit First attempt failed with unmunge: Error: Invalid credential even after the key files were copied and md5sums matched. Root cause: munged only reads its key file once, at daemon startup — overwriting the file on disk does NOT affect an already-running daemon. Fix: after copying/updating a munge.key on ANY node (master or compute), always run systemctl restart munge on that same node — copying the file alone is not enough.
How to verify munge -n | ssh cnode01 unmunge — must return STATUS: Success (0) with a real, current DECODE_TIME (not an epoch-zero "1970" timestamp, which indicates a key mismatch).
munge -n | ssh cnode01 unmunge
Step 1.4 — successful cross-node munge -n | ssh cnode01 unmunge
Phase 2 — OpenHPC Repository Setup
2.1 Install the correct ohpc-release package
Why this step matters The ohpc-release package configures the OpenHPC yum repos (Base + Updates) that provide pre-built, mutually-compatible Slurm, MPI, and module packages — avoiding the need to manually match versions across a from-source build.
Pitfall we hit The originally attempted URL — https://repos.openhpc.community/OpenHPC/3/EL_8/x86_64/ohpc-release-3-1.el8.x86_64.rpm — returned HTTP 404. Root cause: OpenHPC's 3.x release series targets EL9 only; Rocky Linux 8.10 requires the 2.x series. Changing /3/ to /2/ in the repo path ALSO 404'd, because that path serves individual package RPMs, not the ohpc-release bootstrap package itself. The working fix was installing ohpc-release directly from its official GitHub release: github.com/openhpc/ohpc/releases/download/v2.4.GA/ohpc-release-2-1.el8.x86_64.rpm — confirmed via OpenHPC's own wiki (github.com/openhpc/ohpc/wiki/2.X).
How to verify dnf repolist | grep -i ohpc — should list "OpenHPC" and "OpenHPC-updates".
dnf install -y https://github.com/openhpc/ohpc/releases/download/v2.4.GA/ohpc-release-2-1.el8.x86_64.rpm
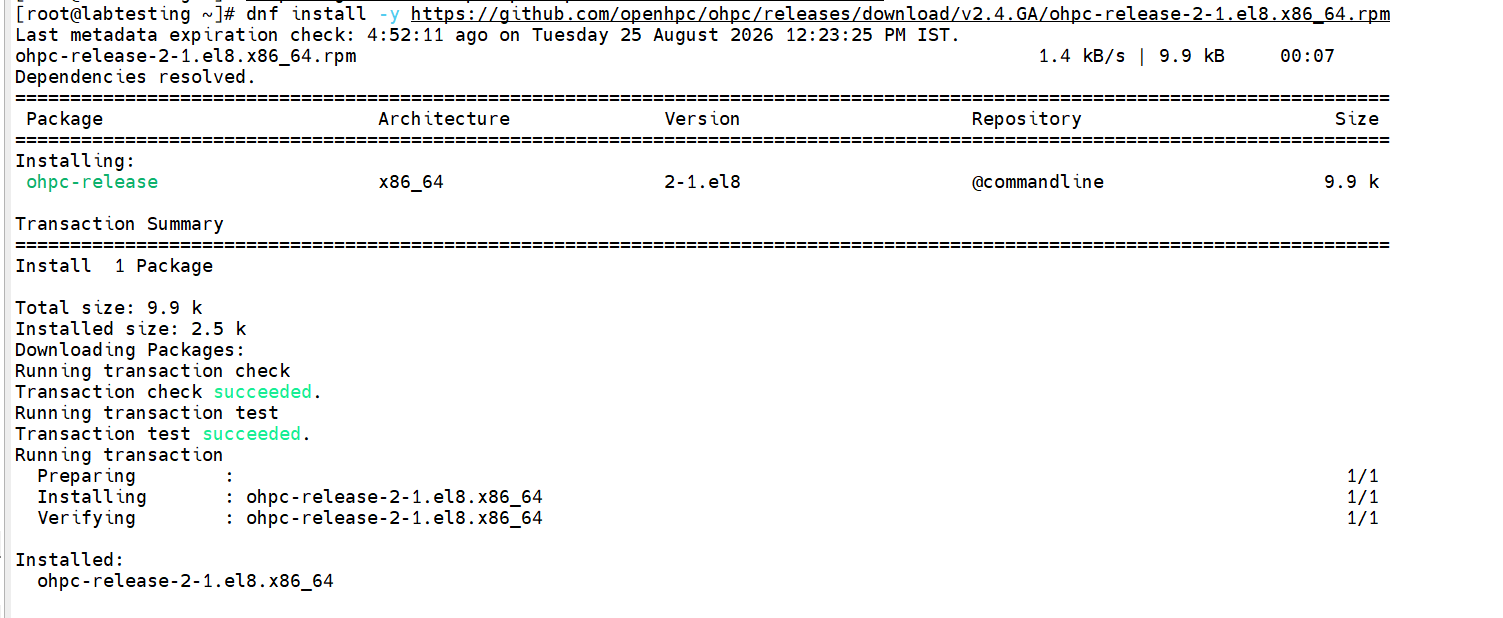
Step 2.1 — dnf repolist showing OpenHPC repos enabled
Phase 3 — Slurm Controller (Master Node)
3.1 Install the controller package
Why this step matters Installs slurmctld (the controller daemon) plus matching MPI/PMIx libraries pre-built by OpenHPC, so later MPI installs (Intel oneAPI, OpenMPI) integrate without separate version reconciliation.
How to verify rpm -qa | grep slurm-ohpc and which slurmctld
dnf install -y ohpc-slurm-server
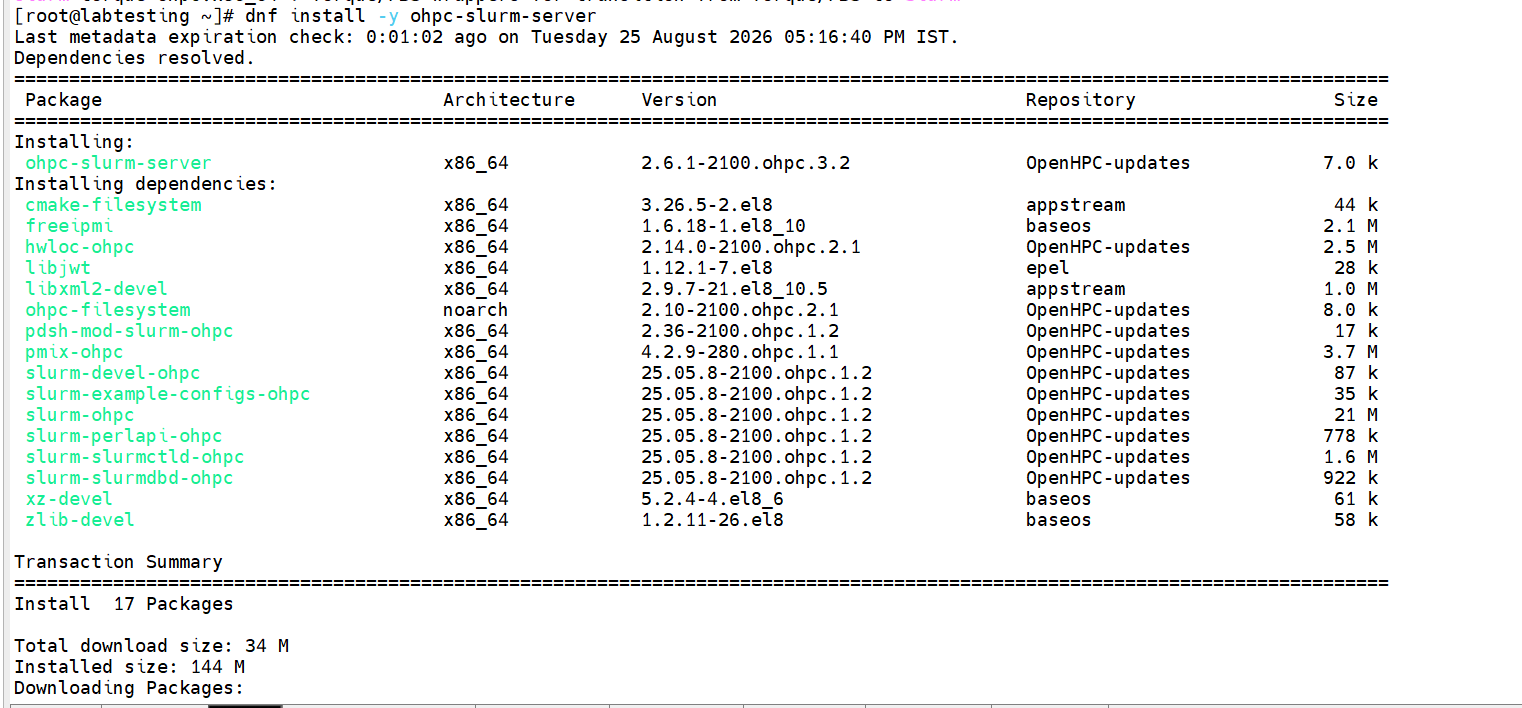
Step 3.1 — ohpc-slurm-server install complete
3.2 Use OpenHPC's provided example config as the base
Why this step matters OpenHPC ships slurm.conf.ohpc pre-populated with the plugin settings (TaskPlugin, JobCompType, Epilog, configless option, interactive-step support) that match the packages actually installed — starting from this instead of a hand-written minimal config avoids missing an OpenHPC-specific setting.
Pitfall we hit An early hand-written slurm.conf used CPUs=2 for cnode01, guessed rather than measured. This later caused the node to be marked "inval" (see Phase 5). The OpenHPC example config also defaults the partition name to normal, not a custom name like compute — this is expected OpenHPC behavior, not an error, and does not need to be renamed.
How to verify Not applicable yet — config is edited further in the next steps.
cd /etc/slurm/
cp slurm.conf.ohpc slurm.conf
vi slurm.conf

Step 3.2 — slurm.conf.ohpc copied to slurm.conf
3.3 Set the correct NodeName line using measured hardware
Why this step matters slurmd -C queries the actual node hardware and prints the exact NodeName= line Slurm expects — using this instead of manually guessing CPUs/Sockets/Cores avoids a hardware-mismatch rejection.
How to verify Confirm this line is present in /etc/slurm/slurm.conf before continuing.
xdsh cnode01 "slurmd -C"
Output used (append State=UNKNOWN, which -C does not include):
NodeName=cnode01 CPUs=1 Boards=1 SocketsPerBoard=1 CoresPerSocket=1 ThreadsPerCore=1 RealMemory=3633 State=UNKNOWN

Step 3.3 — slurmd -C output
3.4 Confirm ClusterName, SlurmctldHost, and PartitionName
Why this step matters SlurmctldHost must exactly match the master's hostname exactly as resolvable in DNS/hosts — a mismatch here is one of the most common reasons slurmctld silently refuses to serve requests.
How to verify Confirm SlurmctldHost=labtesting matches hostname on the master.
grep -iE "^ClusterName|^SlurmctldHost|^PartitionName|^NodeName" /etc/slurm/slurm.conf
3.5 Create required directories and start the controller
Why this step matters slurmctld refuses to start if its state-save directory doesn't exist or isn't owned by the slurm service user — this is where job/node state is persisted across restarts.
How to verify systemctl status slurmctld — must show "active (running)".
mkdir -p /var/spool/slurm/ctld /var/spool/slurm/d
chown slurm:slurm /var/spool/slurm/ctld /var/spool/slurm/d
systemctl enable --now slurmctld
systemctl status slurmctld
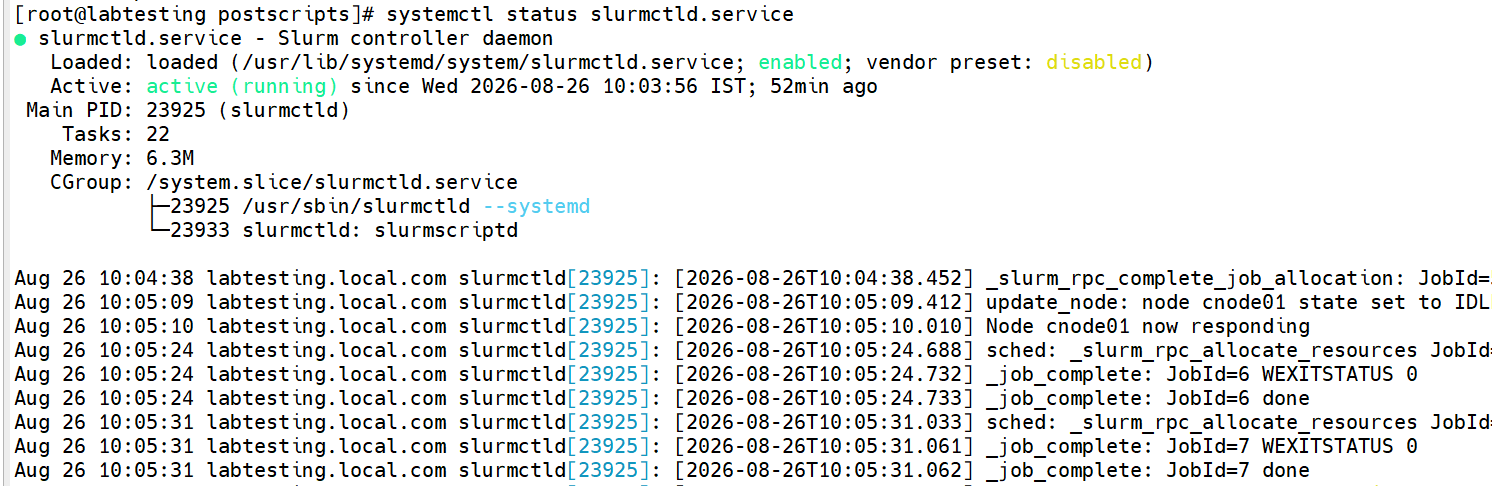
Step 3.5 — slurmctld active status
3.6 Confirm the controller sees the node
Why this step matters This is the first end-to-end signal that slurm.conf loaded successfully — the node will show as "unk" (unknown) until slurmd is also running on the compute side, which is expected at this stage.
How to verify sinfo should list the partition and cnode01, state "unk" is expected for now.
sinfo

Step 3.6 — sinfo showing node in unk state
Phase 4 — Slurm Client (Compute Node)
4.1 Create the compute-node postscript
Why this step matters Mirrors the controller setup on the client side — installs matching Slurm client packages and points slurmd at the controller's config.
cat > /install/postscripts/setup_slurm_client << 'EOF'
#!/bin/bash
MASTER_IP=$(getent hosts $MASTER | awk '{print $1}')
dnf install -y https://github.com/openhpc/ohpc/releases/download/v2.4.GA/ohpc-release-2-1.el8.x86_64.rpm
dnf install -y ohpc-slurm-client
curl -s -o /etc/slurm/slurm.conf http://${MASTER_IP}/install/postscripts/files/slurm.conf
mkdir -p /var/spool/slurm/d
chown slurm:slurm /var/spool/slurm/d
systemctl enable --now munge
systemctl enable --now slurmd
echo "slurmd configured against controller ${MASTER_IP}"
EOF
chmod +x /install/postscripts/setup_slurm_client
Note: if this script doesn't work, copy the repos from the master node to the client node, then after copying, update the node again with the script above — this will install the client packages on the client node.
4.2 Copy the live config where the postscript can fetch it
Why this step matters The controller and every compute node must run from a byte-identical slurm.conf — copying only after the config is finalized (Phase 3) avoids syncing a stale or incomplete version.
Pitfall we hit cp /etc/slurm/slurm.conf /install/postscripts/files/slurm.conf failed with "No such file or directory" because the files subdirectory didn't exist yet under /install/postscripts. Fix: mkdir -p /install/postscripts/files first, or copy to an existing served path such as /install/syncfiles/etc/slurm/ instead.
How to verify ls /install/postscripts/files/slurm.conf should exist and be non-empty.
cp /etc/slurm/slurm.conf /install/postscripts/files/slurm.conf
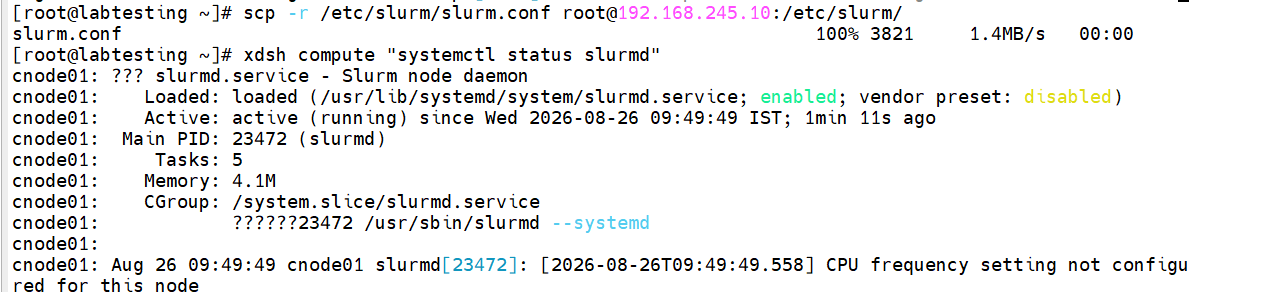
Step 4.2 — slurm.conf copied into postscripts/files
4.3 Push the postscript to the compute group
Pitfall we hit First run failed with nothing provides epel-release needed by ohpc-release and No match for argument: ohpc-slurm-client. Root cause: the compute node's yum repo list didn't yet include EPEL/OpenHPC (those were only configured on the master when ohpc-release was installed directly, not distributed to nodes). Fix applied: copied the master's working repo files directly — scp -r /etc/yum.repos.d/* root@<node-ip>:/etc/yum.repos.d/, then xdsh compute "dnf clean all" before re-running the postscript. On the real cluster, baking a repo-sync postscript step (or a synclist for /etc/yum.repos.d) is a cleaner permanent fix than manual scp.
How to verify Re-run updatenode; installation of ohpc-slurm-client and its ~30 dependent packages should complete without repo errors.
chdef compute -p postscripts=setup_slurm_client
updatenode compute -P setup_slurm_client
4.4 Confirm slurmd starts and check for auth errors
Pitfall we hit slurmd started but its log immediately showed error: Munge decode failed: Invalid credential with ENCODED/DECODED timestamps both reading "Thu Jan 01 1970" — the classic signature of a Munge key mismatch. This was resolved by fully completing Phase 1.4 (cross-node munge test + restarting munge on BOTH sides after any key copy) before proceeding further.
How to verify xdsh compute "munge -n | unmunge" AND munge -n | ssh cnode01 unmunge — both must succeed before trusting slurmd's registration.
xdsh compute "systemctl status slurmd"

Step 4.4 — slurmd active, no Munge errors in log
Phase 5 — Cluster Verification & First Job
5.1 Confirm node state
Pitfall we hit Node cycled through several states before reaching "idle": unk (slurmd not yet running) → inval → drain → finally idle. The inval state appeared after Munge was fixed, with reason "Low socketcorethread count, Low CPUs" (visible via sinfo -R and scontrol show node cnode01). Root cause: an earlier hand-edited slurm.conf had guessed CPUs=2, but the VM actually has 1 CPU. Fix: replaced the NodeName line with the exact output of slurmd -C (Phase 3.3), re-synced slurm.conf to the compute node, and restarted slurmctld + slurmd. Even after the CPU count was corrected, the node stayed in "drain" — Slurm does not automatically clear a drain reason once set, even after the underlying cause is fixed. Fix: scontrol update NodeName=cnode01 State=RESUME manually cleared it.
How to verify sinfo should show STATE=idle with no asterisk and no drain/inval/down.
sinfo
5.2 If drained, inspect and clear the reason
Why this step matters sinfo -R and scontrol show node print the exact Reason= string an admin (or Slurm itself) set — always check this before assuming the fix worked, since drain state does not self-clear.
How to verify sinfo should flip to idle immediately after State=RESUME.
sinfo -R
scontrol show node cnode01
scontrol update NodeName=cnode01 State=RESUME
5.3 Run the end-to-end test job
Why this step matters This is the definitive proof the full pipeline works: controller schedules the job, authenticates the request via Munge, dispatches it to slurmd on the compute node, and returns real output — exactly what a real HPC job submission will do.
How to verify Output should be exactly: cnode01
srun -N1 hostname
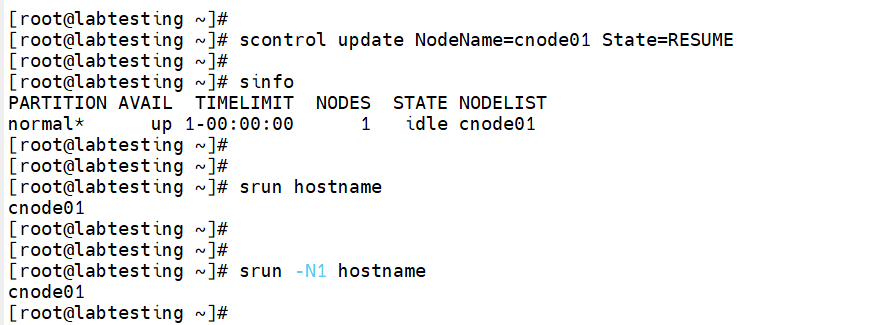
Step 5.3 — srun -N1 hostname returning cnode01
Appendix A — Full Issue Log & Fixes
Every real error hit during this lab run, in the order encountered, kept for fast recognition on the production cluster.
| Symptom | Cause | Fix |
|---|---|---|
| dnf 404 on repos.openhpc.community/OpenHPC/3/EL_8/... | OpenHPC 3.x targets EL9 only; wrong series for Rocky 8.10. | Use OpenHPC 2.x. Install ohpc-release from github.com/openhpc/ohpc/releases/download/v2.4.GA/ohpc-release-2-1.el8.x86_64.rpm. |
| sinfo: "DNS SRV lookup failed / Could not establish a configuration source" | Ran sinfo before slurm.conf existed / before slurmctld was configured — Slurm defaulted to configless-mode DNS discovery, which isn't set up. | Create /etc/slurm/slurm.conf (from slurm.conf.ohpc) and start slurmctld first. |
| updatenode: "nothing provides epel-release" / "No match for argument: ohpc-slurm-client" | Compute node's yum repos didn't include EPEL/OpenHPC — only the master had them configured. | scp /etc/yum.repos.d/* to the compute node, xdsh compute "dnf clean all", then re-run the postscript. Better long-term: a synclist or repo-sync postscript. |
cp slurm.conf ... /install/postscripts/files/slurm.conf: No such file or directory |
The "files" subdirectory under postscripts didn't exist yet. | mkdir -p /install/postscripts/files before copying, or use an already-existing served path like /install/syncfiles/etc/. |
| slurmd log: "Munge decode failed: Invalid credential", timestamps read 1970 | Munge key file was updated/copied but munged was not restarted, so the daemon kept using its old in-memory key. | After ANY munge.key change, always: systemctl restart munge on that node. Verify with a CROSS-node test (munge -n \| ssh <node> unmunge), not just a local unmunge. |
| sinfo shows node state "inval", reason "Low socketcorethread count, Low CPUs" | slurm.conf's NodeName line had a guessed CPUs=2, but the VM only has 1 CPU. |
Use slurmd -C on the actual node to get the exact hardware line; paste it into slurm.conf verbatim (plus State=UNKNOWN). |
| Node stuck in "drain" even after the CPU mismatch was fixed | Slurm does not automatically clear a drain reason once set, even after the root cause is resolved. | scontrol update NodeName=cnode01 State=RESUME |
Appendix B — Notes for Production Deployment
- Repo distribution: bake EPEL + OpenHPC repo files into the compute-node postscript (or a synclist) from the start, rather than manually scp-ing them after a failure — this was the single most time-consuming issue in this lab run.
- Hardware sizing: always generate NodeName lines with
slurmd -Crun on each real server, never hand-typed — real hardware CPU/socket/core/thread counts must be exact or nodes will be marked invalid. - Munge key rollout: after distributing munge.key via postscript to multiple real nodes, verify with a cross-node test from the controller to EVERY node, not just a sample — a single mismatched node will fail job dispatch to that node specifically.
- Partition naming: OpenHPC's default example config names the partition "normal", not "compute" — decide deliberately whether to rename it before production, since users will reference it directly in job scripts (
#SBATCH -p <name>). - Configless mode: slurm.conf already has
SlurmctldParameters=enable_configlessset from the OpenHPC template. This lab run still manually copies slurm.conf to each node — switching to true configless mode (where nodes fetch slurm.conf automatically from the controller) would remove the manual re-sync step and is worth adopting once the cluster is stable.